Welcome To Your ETM User Tutorials
Getting Started
NOTE: Please go through each tutorial in order when setting up your account to avoid errors.
Get Started Here
Before doing anything, watch this quick start video so you can get your account live in less than 5 minutes. NOTE: The colors are different on the dashboard but this process has not changed.
If Telnyx is your gateway please download their getting started guide below.
Telnyx Getting Started Guide
Toll-Free Registration / 10DLC A2P Registration
10DLC/A2P Registration is required for sending SMS messages from Local Phone Numbers in the United States.
Toll Free Verification is required for sending SMS messages from Toll-Free Numbers in the United States.
The links to the left will open in a new window and take you to the information for each specified gateway.
Registration Instructions By Gateway
TWILIO 10DLC/A2P [Local Numbers]
TWILIO Toll-Free Verification Information
TELNYX 10DLC/A2P [Local Numbers]
TELNYX Toll-Free Verification Information
PLIVO 10DLC/A2P [Local Numbers]
PLIVO Toll Free Verification Information
SIGNALWIRE 10DLC/A2P [Local Numbers]
SIGNALWIRE Toll-Free Verification Information
BANDWIDTH.COM 10DLC/A2P [Local Numbers]
BANDWIDTH.COM Toll-Free Verification Information
YTEL 10DLC/A2P [Local Numbers]
YTEL Toll-Free Verification Information
Module 1 - Setting Up The Platform Features Correctly
How to Login
Just Click the login button and bookmark it.
Enter your username (This may be your email address)
Enter your password.
Button not working? You can go directly to https://rockstarsms.app
NOTE: If you're having issues, please contact your agency administrator.
How To Edit Account Settings
1. Hover over your name in the top right
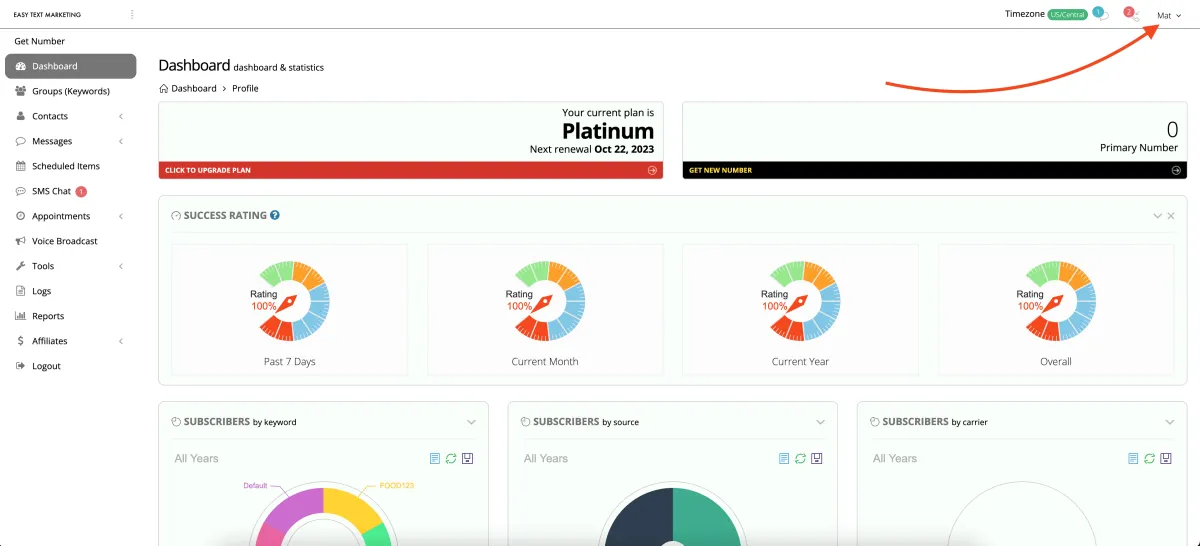
2. Click Account Settings
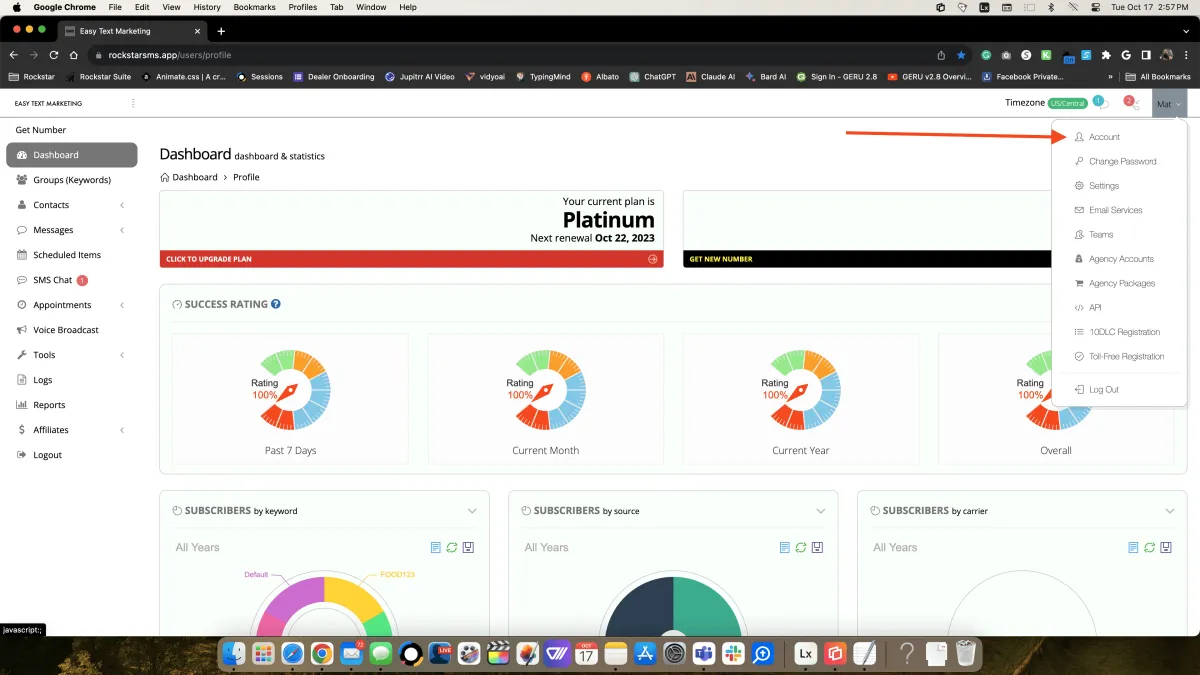
How To Update Your Password
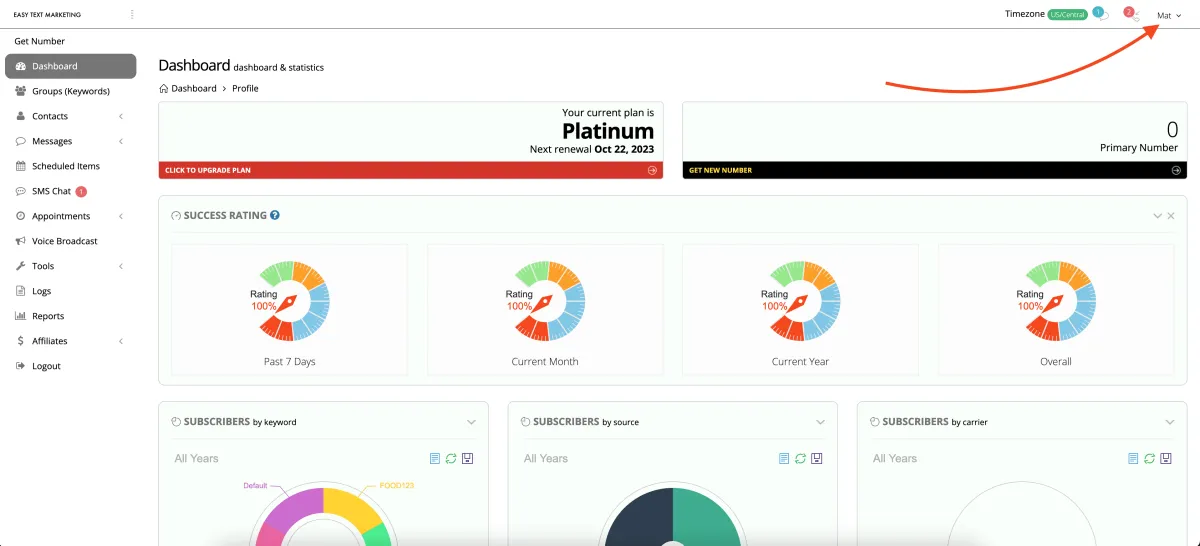
1. Hover over your name

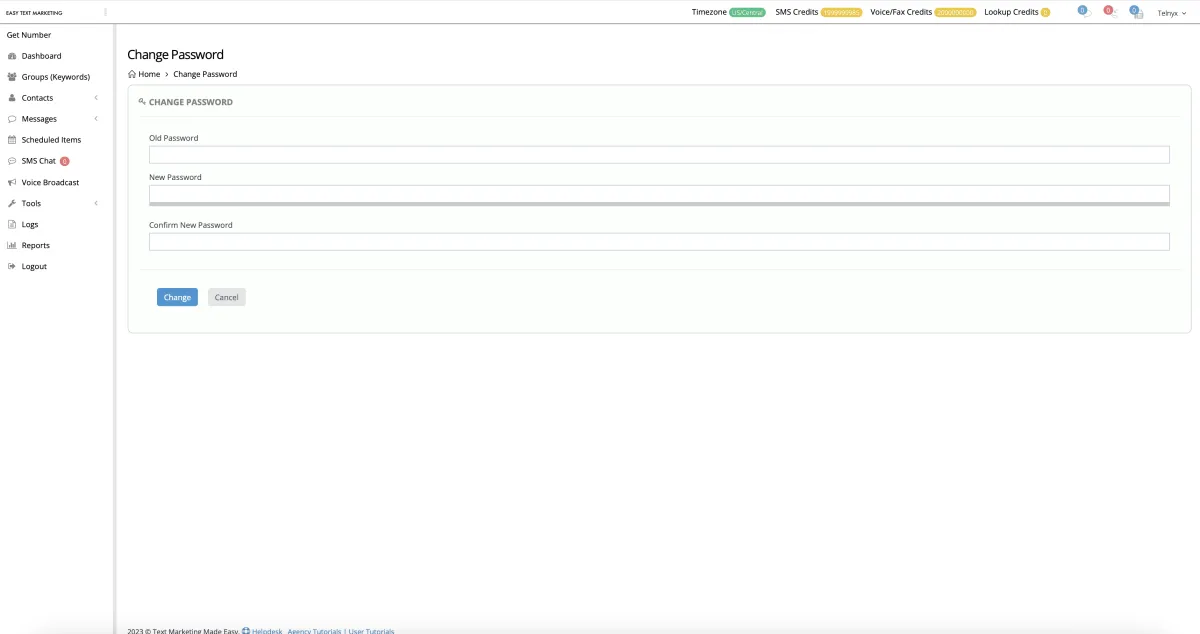
2. Click Change Password
3. Enter New Password
How to Set or Update Your SMS Gateway
NOTE: YOU CANNOT SEND MESSAGES ON OUR PLATFORM WITH A 'TRIAL' ACCOUNT PHONE NUMBER FROM TWILIO, TELNYX OR PLIVO. YOU MUST FOLLOW THESE STEPS FIRST:
CREATE YOUR ACCOUNT WITH TWILIO, TELNYX OR YOUR OTHER GATEWAY OF CHOICE.
UPLOAD MONEY INTO THE ACCOUNT (MOST REQUIRE A $20 MINIMUM)
THEN COPY YOUR GATEWAY TOKEN INFORMATION AND CONNECT YOUR GATWAY TO OUR PLATFORM.
TWILIO CALLS THESE THE 'Account SID' AND 'AUTH TOKEN'
PLIVO CALLS THESE THE 'AUTH ID' AND 'AUTH TOKEN'
CLICK HERE FOR STEP BY STEP TELNYX INSTRUCTIONS
ONCE YOU HAVE SET UP YOUR GATEWAY, YOU WILL BE ABLE TO CLICK 'GET NEW NUMBER' INSIDE OF OUR PLATFORM AND PURCHASE YOUR PHONE NUMBER
NOTE: Video has no sound
How To Get A New Phone Number
NOTE: You first need to add your gateway under the account settings. Once you've done that, you can buy a number through the platform. If you've already got an existing number, please see the next tutorial.
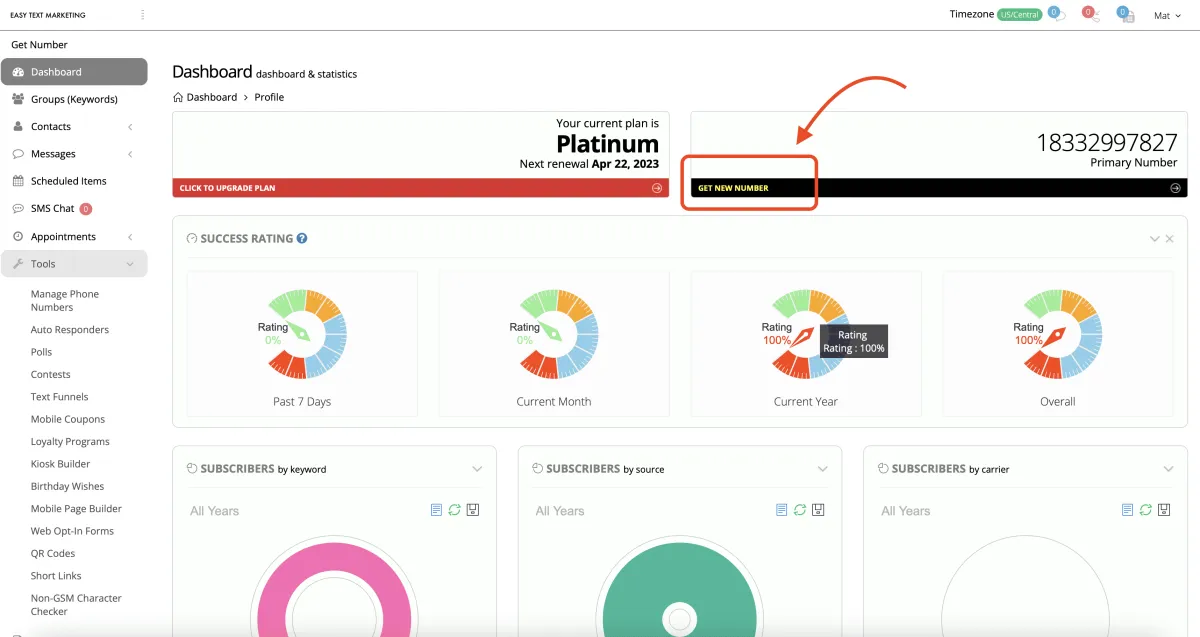
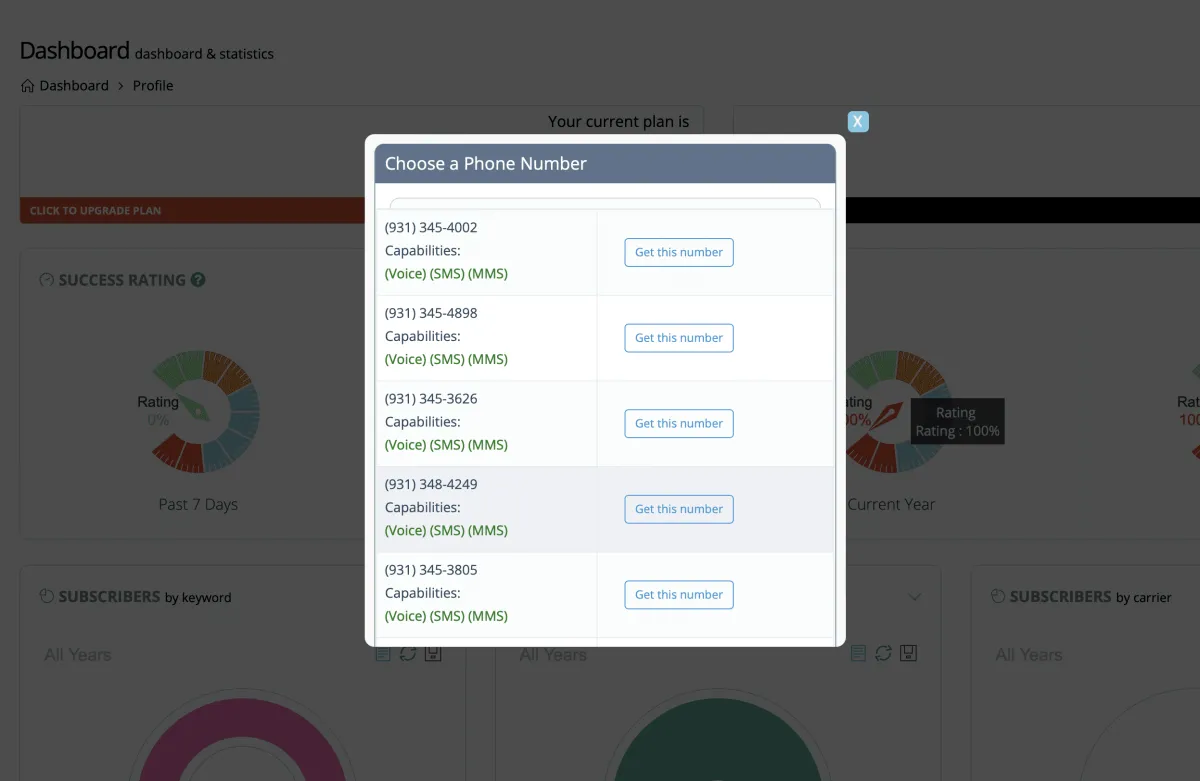
1. Click Get New Number
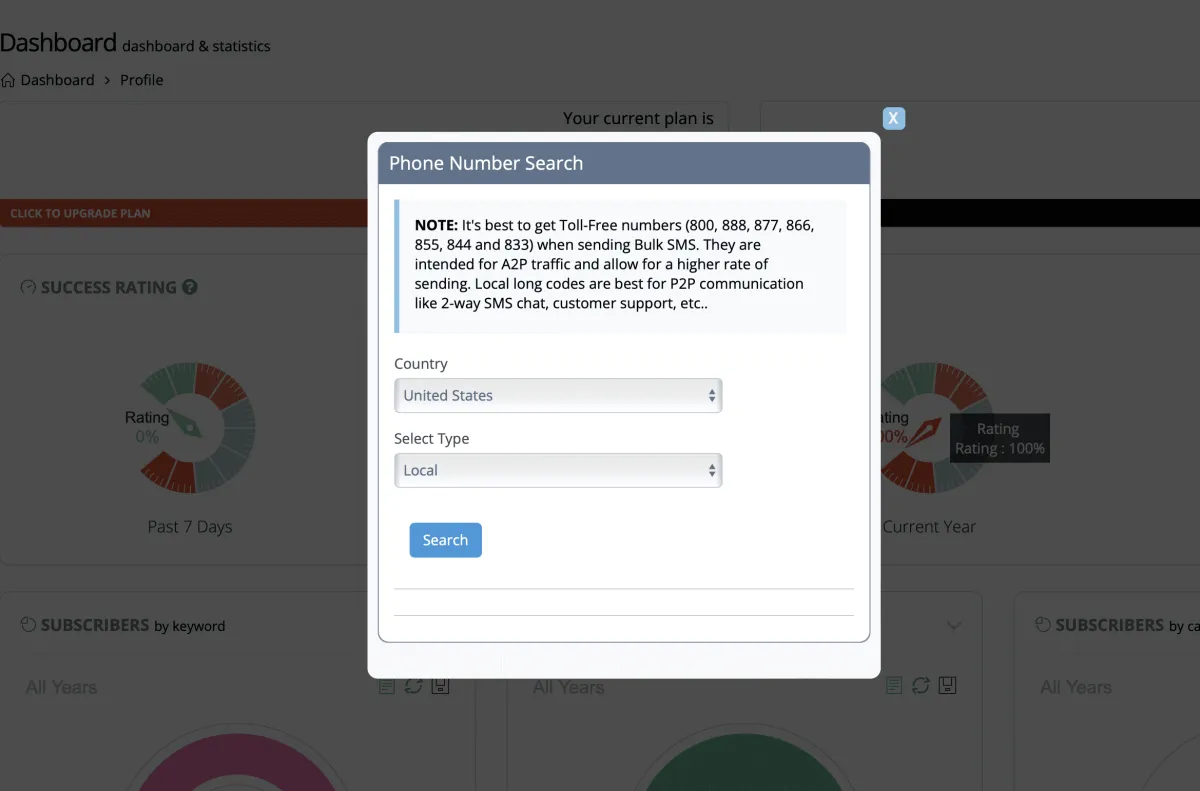
2. Choose Country & Number Type
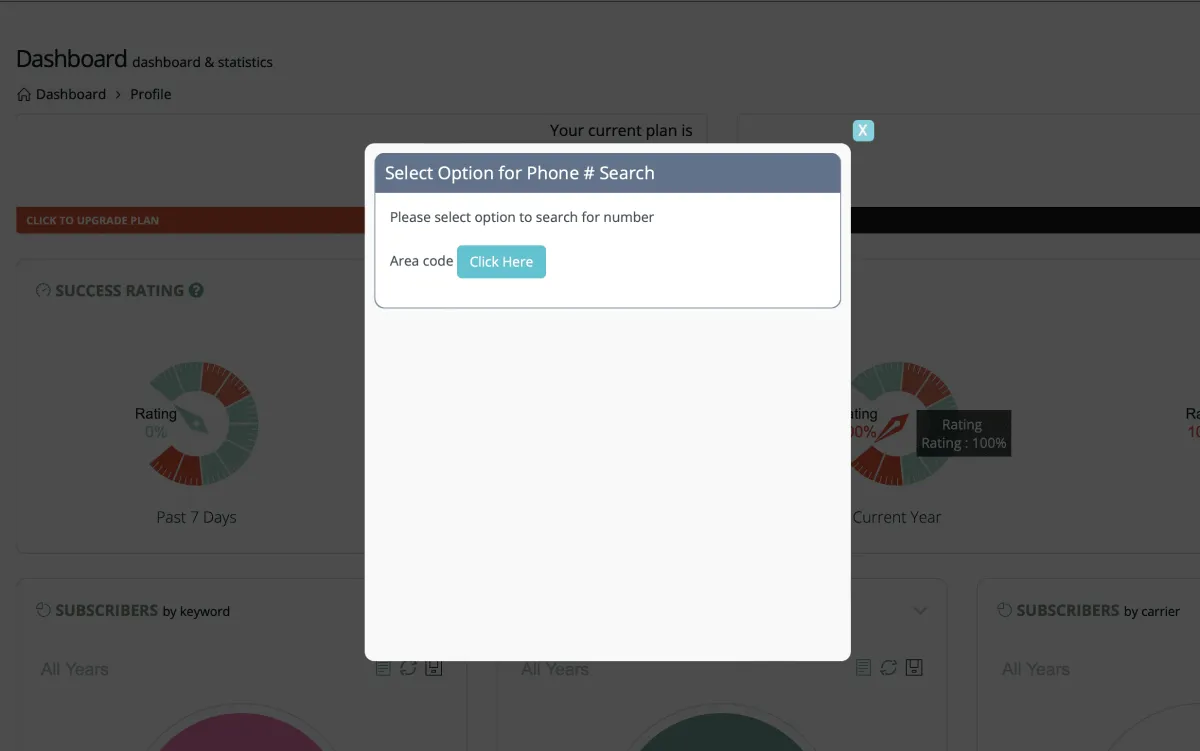
3. Click Button to Select
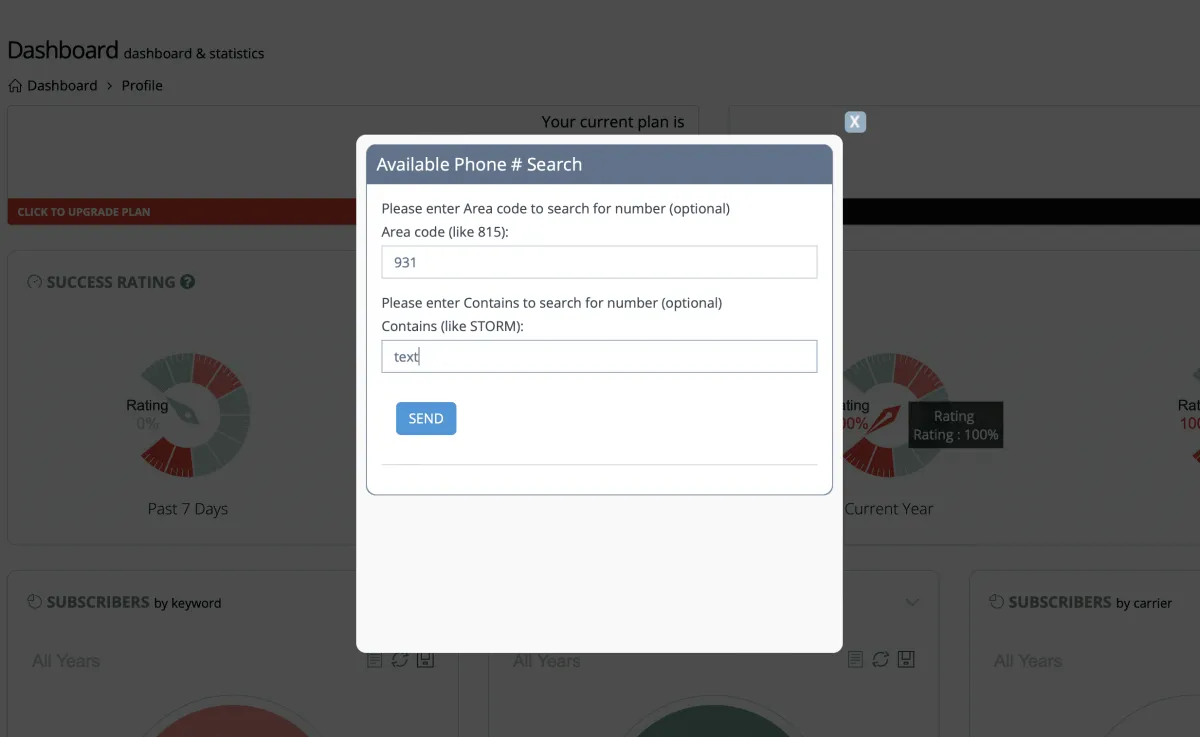
4. Enter Area Code or Toll-Free Prefix
5. Click 'Get This Number' to Buy
How To Manage Existing Numbers
NOTE: Before you can add an existing number from your gateway (Twilio, Telnyx, Plivo, etc.,) you will first need to add your gateway under the account settings.
Please see the tutorial titled "Setting and Updating your SMS Gateway".
Once you've done that, you can buy a number through the platform and it will automatically attach to, and bill through, your gateway.
IMPORTANT: If you’re adding a number that you have already purchased inside of your gateway you will need to add our webhooks. Please see the Webhooks List in this section.
Setting/Removing Primary Number & Secondary Number
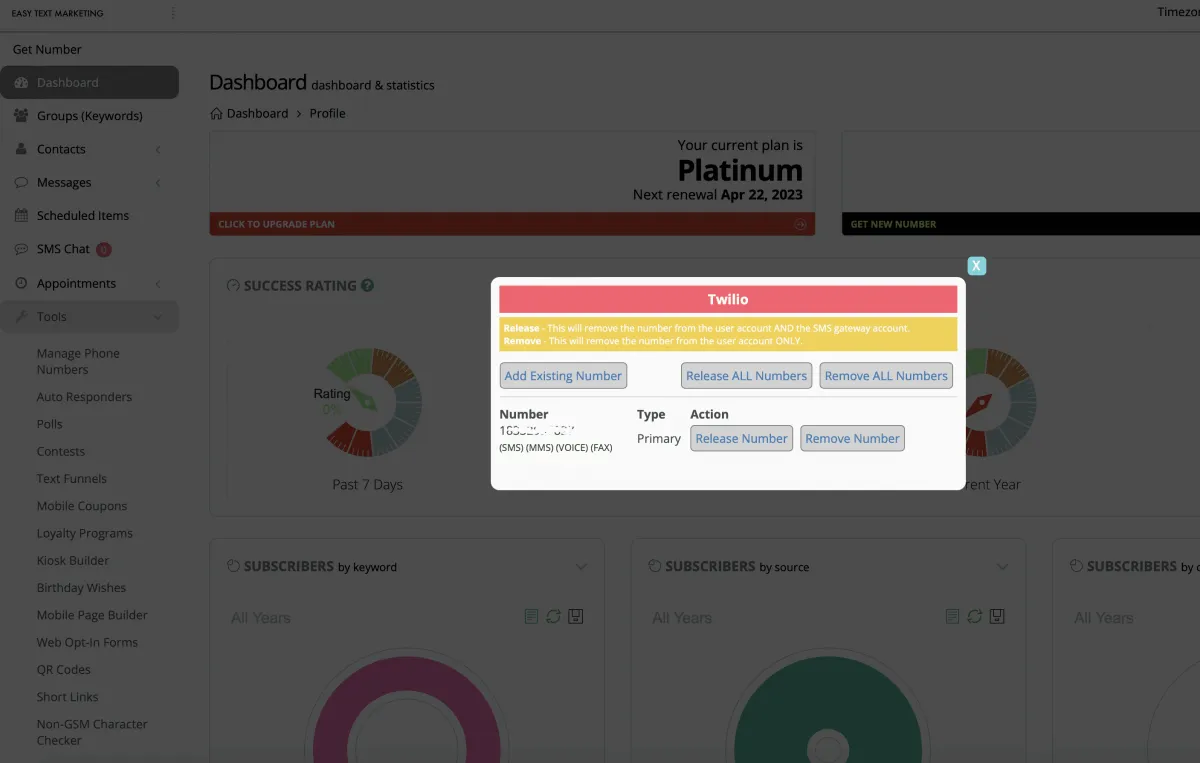
If you have more than one phone number in your account and want to change the primary number you will click Tools>Manage Phone Numbers> and click ‘remove’ on the primary number. That will remove it from the platform and automatically move the secondary number into the primary position. If you want to add the other phone number back into the account in a secondary position you will use the instructions outlined in the steps above to add it back in.
IMPORTANT: REMOVING vs RELEASING Phone Numbers
Removing a phone number only removes it from our platform. It will still exist in your gateway [Twilio, Telnyx, etc.]. This allows you to go to your gateway and reuse that number for other purposes if you’d like. It also means your gateway will continue to bill you for that number.
Releasing a phone number will remove it from our platform and it will delete it from your gateway. You should only click ‘release’ if you want to let the number go and stop being billed for it.
NOTE: After releasing a phone number we also recommend that you log into your gateway to be certain the number was in fact released from your gateway. We cannot be held responsible for any API hiccups on the end of your gateway so it’s always best to double check after clicking release.
Webhooks by Gateway
Twilio
Voice Webhook to POST: https://rockstarsms.app/twilios/voice
Messaging Webhook to POST: https://rockstarsms.app/twilios/sms
Telnyx
SMS Webhook https://rockstarsms.app/telnyxs/sms
Voice Webhook https://rockstarsms.app/telnyxs/voice
Vonage
SMS Only https://rockstarsms.app/nexmos/sms
Plivo
SMS https://rockstarsms.app/plivos/sms
Voice https://rockstarsms.app/plivos/voice
Hung UP https://rockstarsms.app/plivos/hang_up
Bandwidth
SMS webhook URL https://rockstarsms.app/bandwidths/sms
Voice webhook URL https://rockstarsms.app/bandwidths/voice
Signalwire
SMS webhook URL https://rockstarsms.app/signalwires/sms
Voice webhook URL https://rockstarsms.app/signalwires/voice
1. Tools
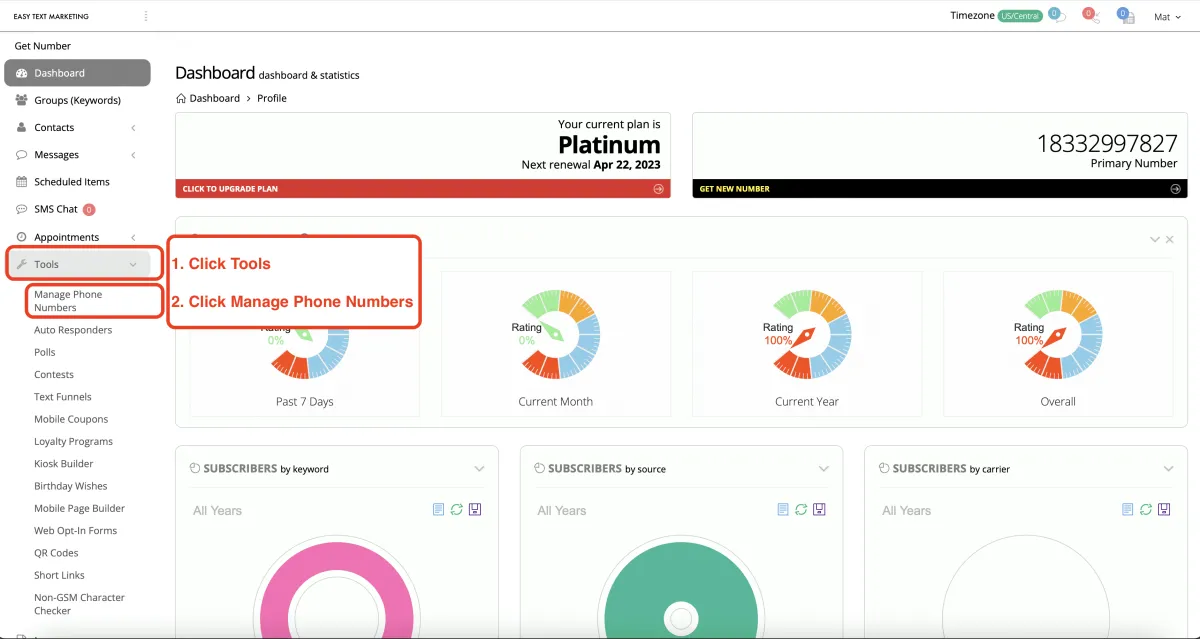
2. Click Mange Phone Numbers
SMPP Information
NOTE: SMPP setup is for expert users. If you're not familiar with SMPP, you can skip this video.
Adding Team Members To Your Account
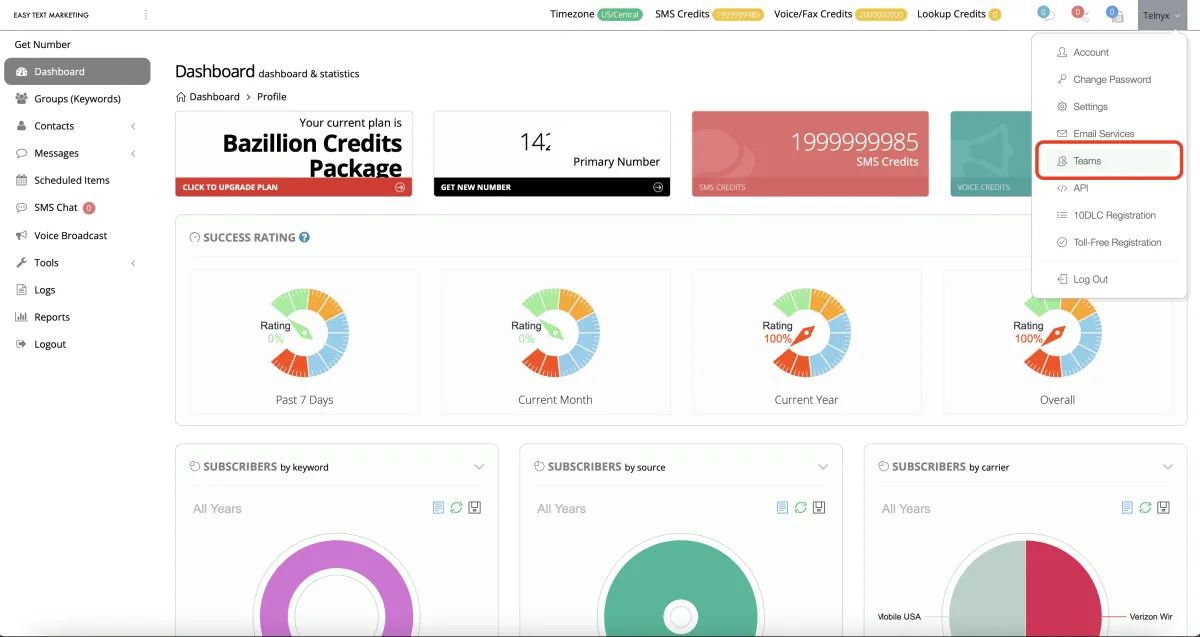
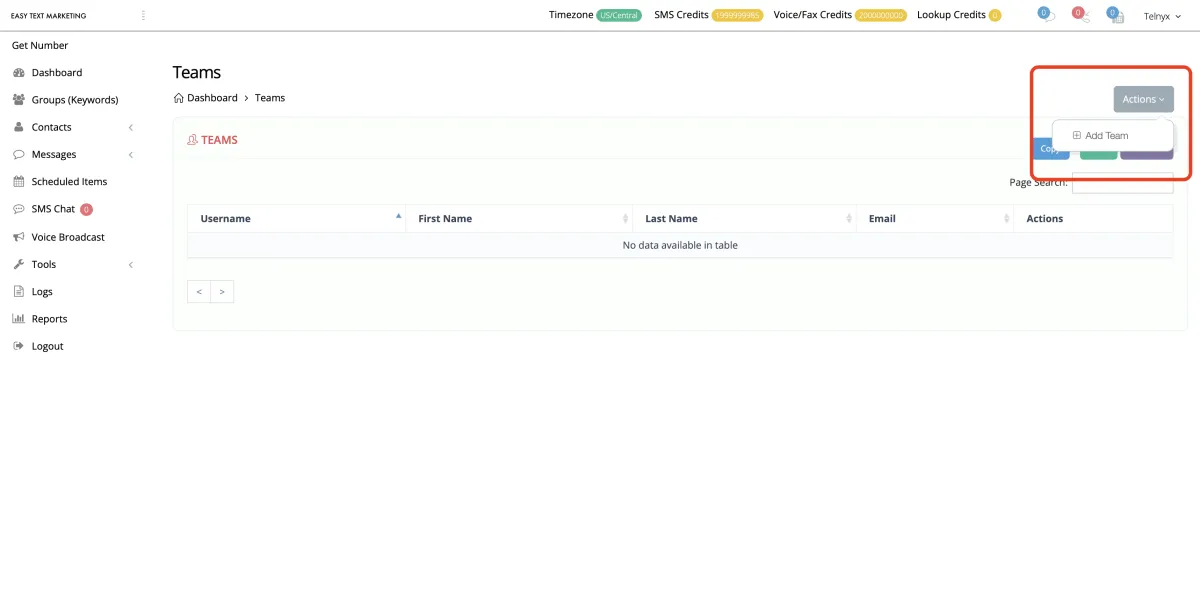
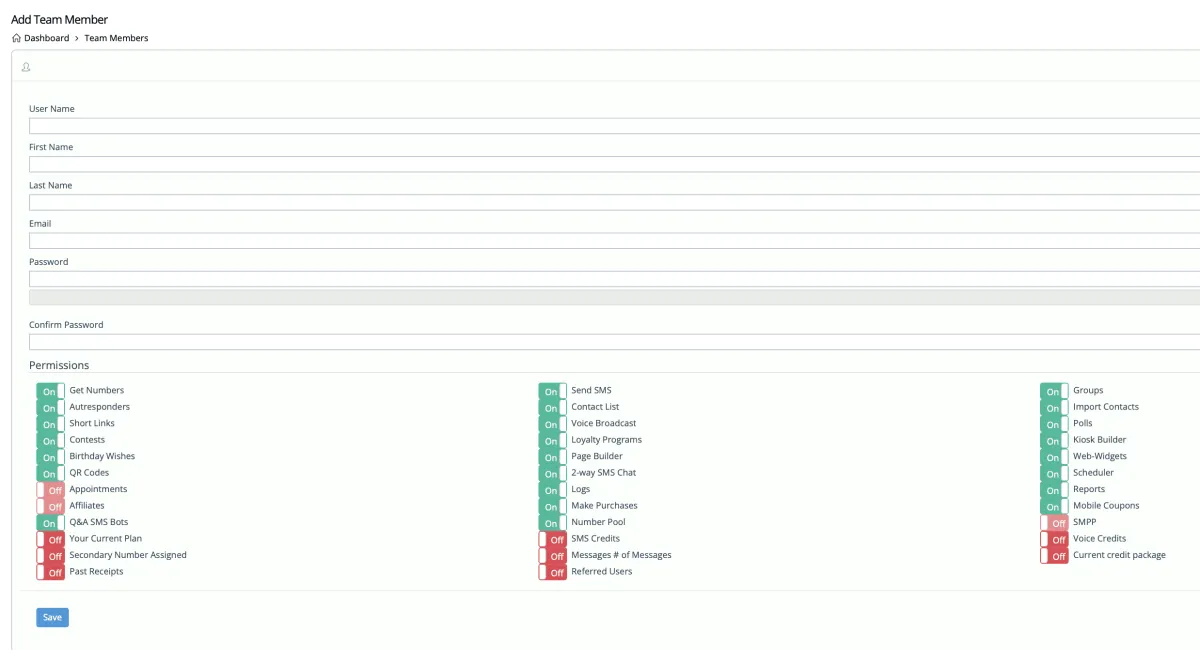
Learn how to add team members to your account step-by-step. Remember to set permissions for what you want your team to be able to access in step 4.
1. Hover over your name
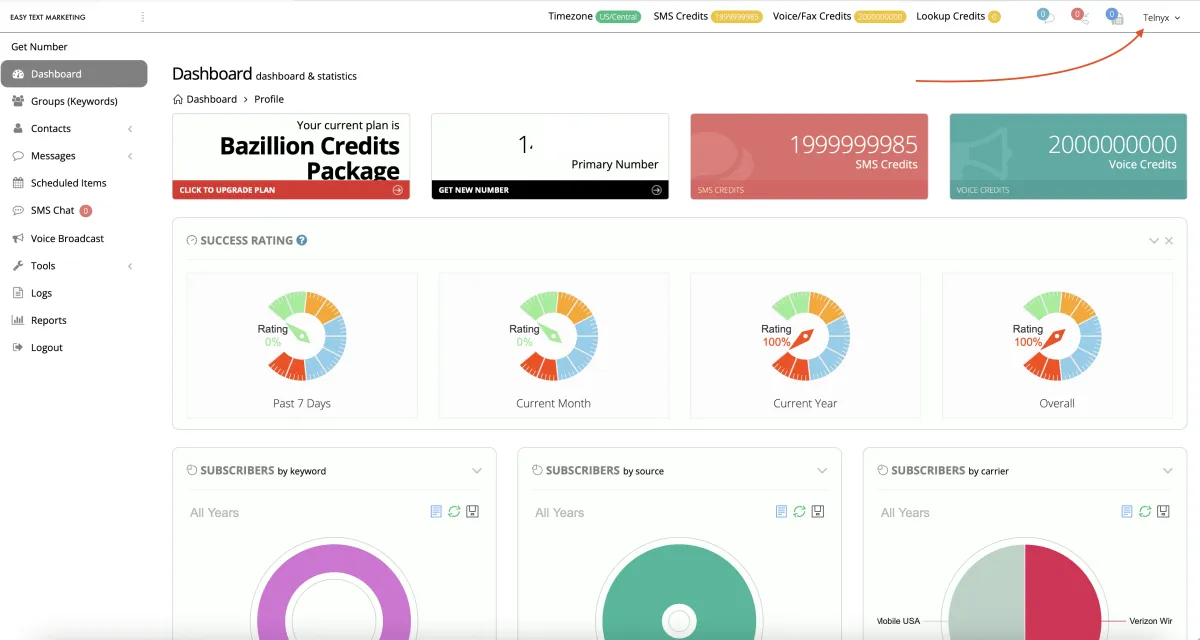
2. Click Teams
3. Click Add Team
4. Enter Info & Set Permissions
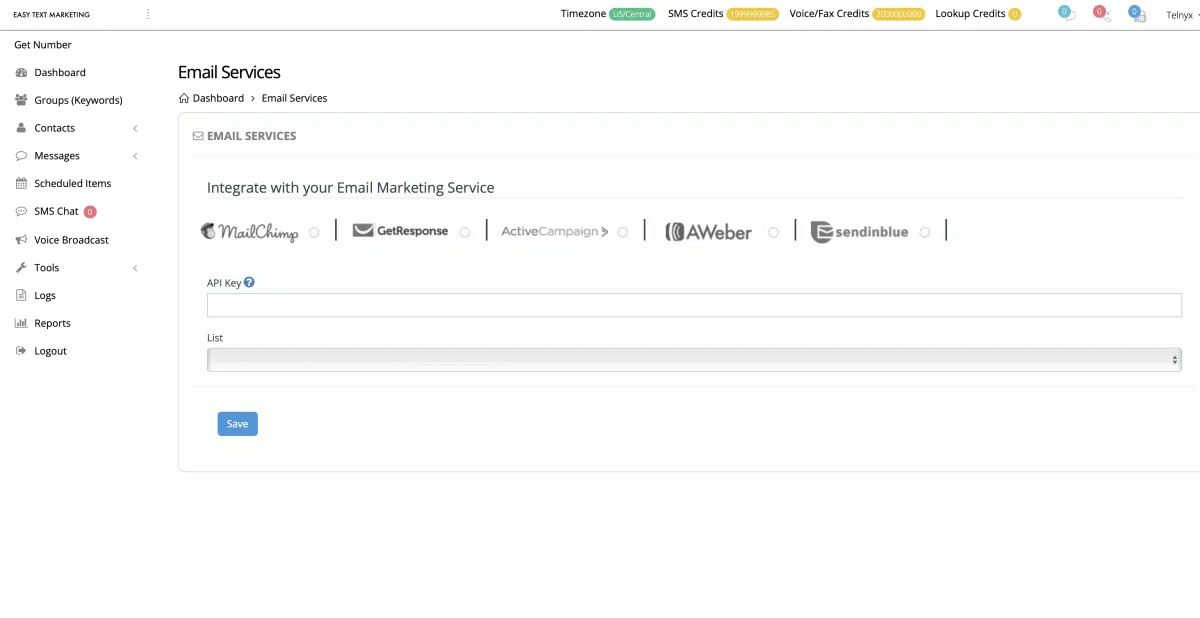
Connecting Email Services
We are an SMS platform but we do have direct integration with specific 5 email marketing providers so that you can add people to your email lists in those platforms when they fill out their information in the web-widget forms we offer. NOTE: If you want to integrate with other providers please see the webhooks tutorial in the next section.
This is NOT an integration that does email marketing from our platform. It is purely to push customer data to your email marketing platform.
1. Hover over your name & click email services
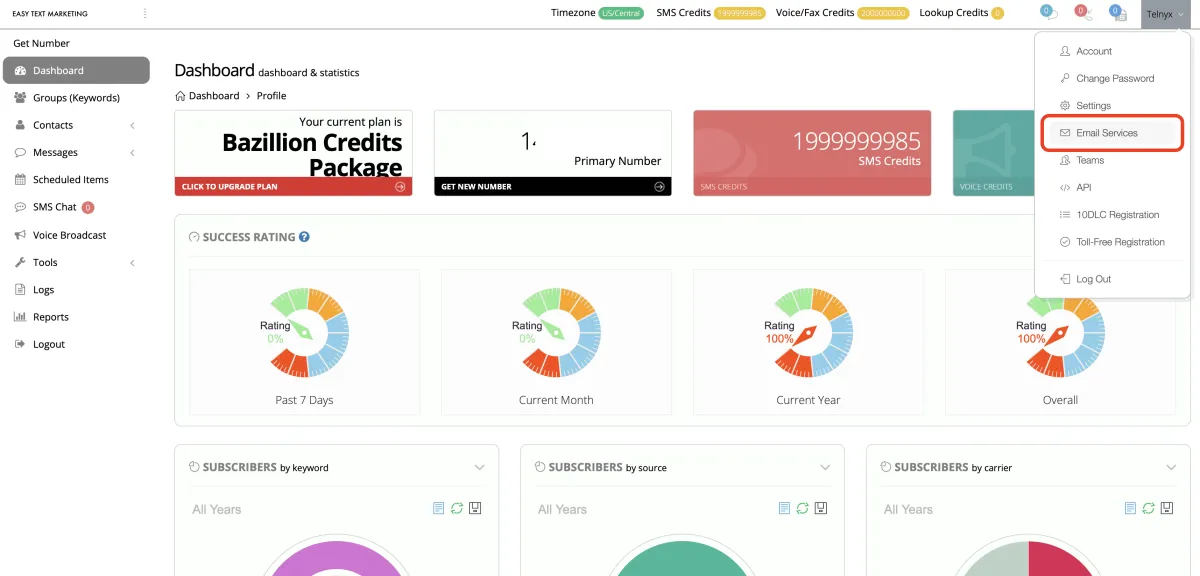
2. Select provider and enter your info
Webhooks - Connecting to Other Platforms
Learn how to push data to other platforms using webhooks with this overview video.
Webhooks - Albato
How to connect to Albato with webhooks
Webhooks - Pabbly
How to connect to Pabbly with webhooks
Webhooks - Zapier
How to connect to Zapier with webhooks
Module 2 - Using the Platform
Creating Keyword Groups
Follow these instructions step-by-step to create groups and keywords.
1. Hover over your name & click email services
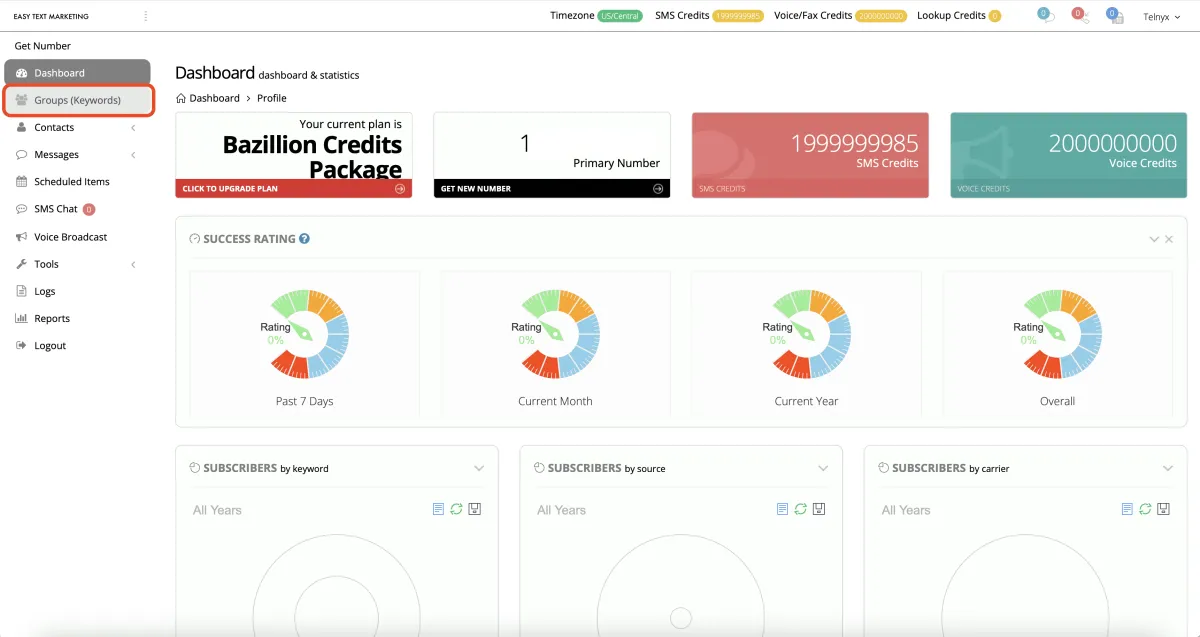
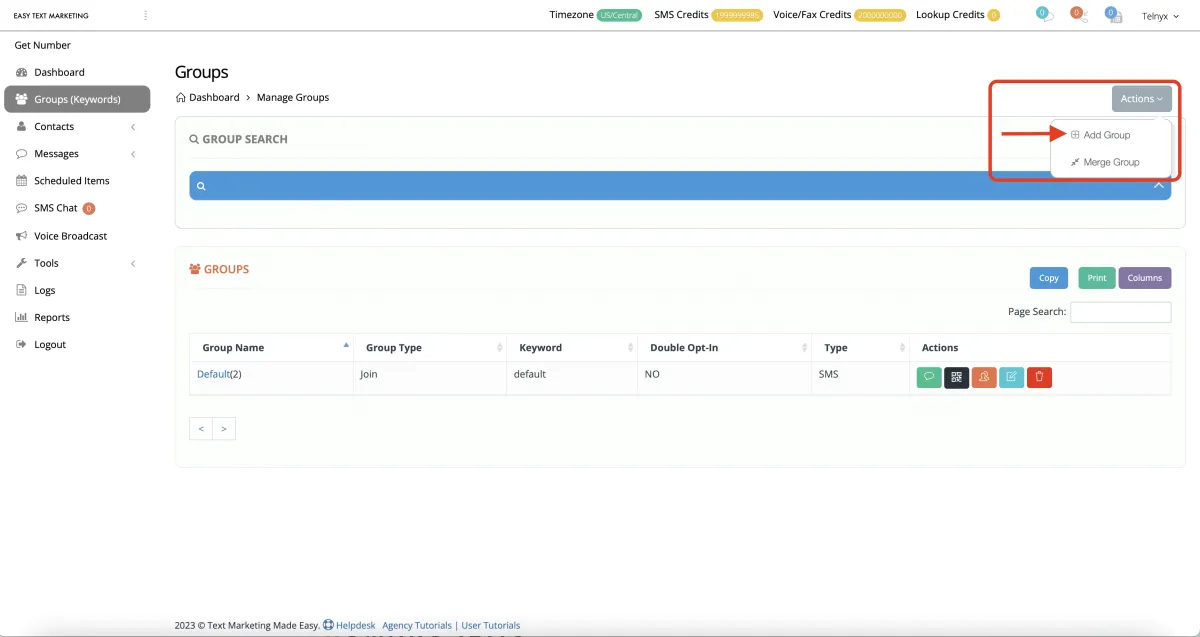
Step 2 - Hover over the Actions button and click Add Group
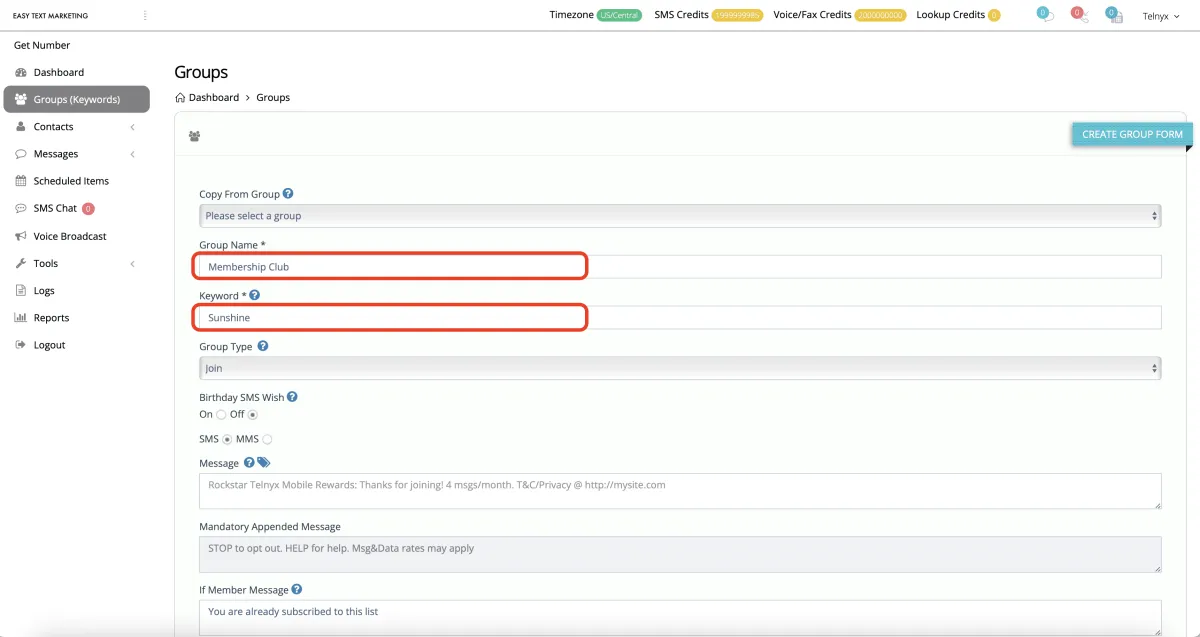
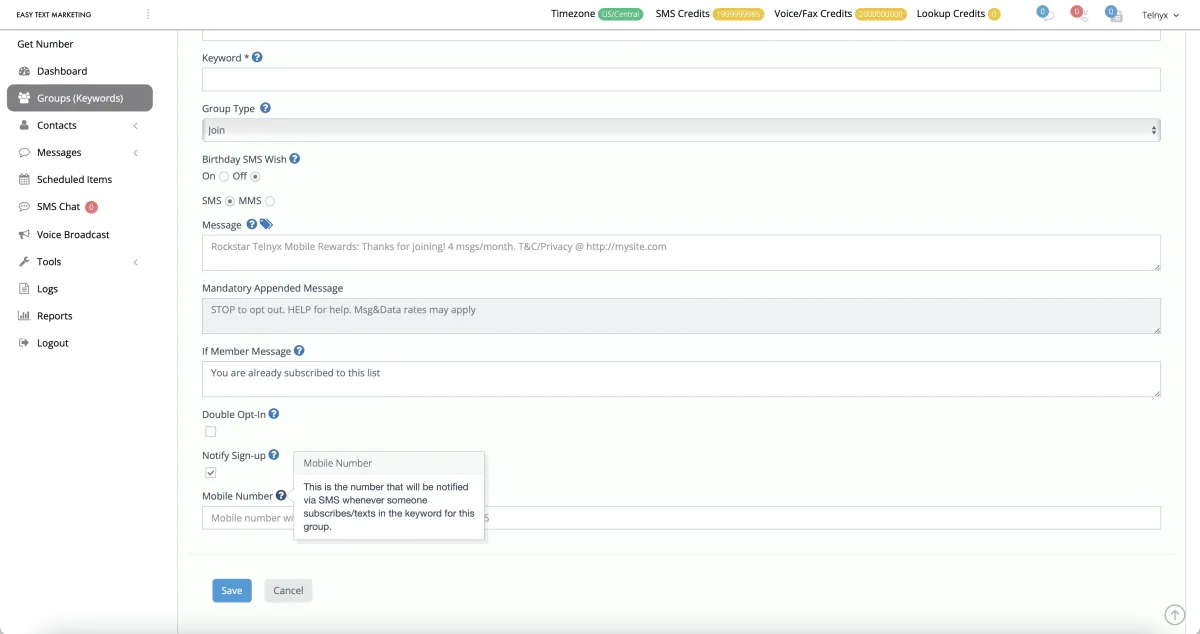
Step 3 - Give the group a name and create a keyword. A keyword is what someone sends to your number to opt-in
NOTE: The keyword has 'rules' to follow so keep these in mind:
NO spaces. Your keyword must be letters or letter and numbers combined but no spaces.Example: SUNSHINE is good SUN SHINE is bad. Sun123 is good but Sun 123 is bad.
If you use a word, try to keep it short and easy.
Don't use words that a phone might auto correct.
Step 4 - Select the type of group you area creating.
Message Type: SMS or MMS - We recommend SMS (Text Message). MMS is picture message but carriers may see it as spam and block it on occasion so SMS is recommended.
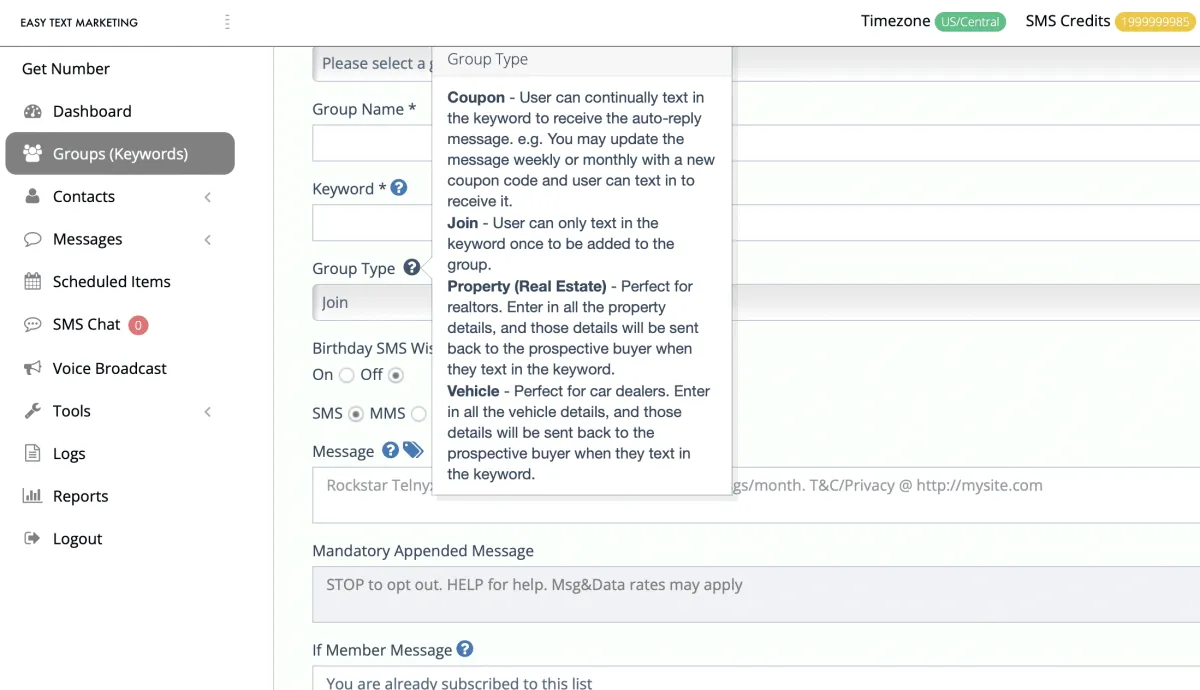
Group Type: There are 4 type of Groups, if you mouse over the '?' (Question mark) you will see the 'hints' we've created that explain each group. If you scroll down, you'll see those hints in the next image.
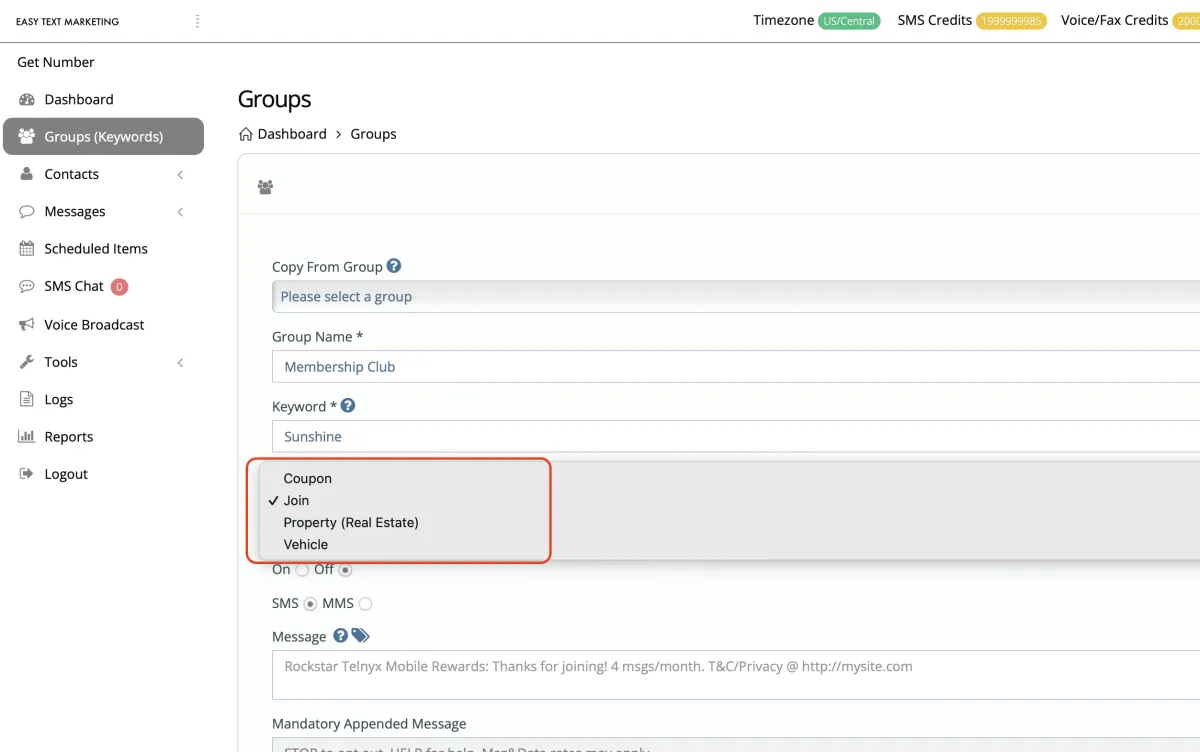
Step 5 - Understanding the 4 group types
Join - If you're building a list that you only want people to opt into once, a "join" group is your best bet.
Coupon - If you want people to text in and see what your "weekly coupon" might be, or your "weekly offer" might be, a coupon group is your best choice. This way, you can keep your keyword the same, and each week you can go in and change what the Message is. This would allow you to advertise things like "Text every Tuesday at noon to find out what our daily happy hour special is."
Property - This is designed for Realtors to be ale to share property information
Vehicle - This is designed for car dealers to share vehicle information
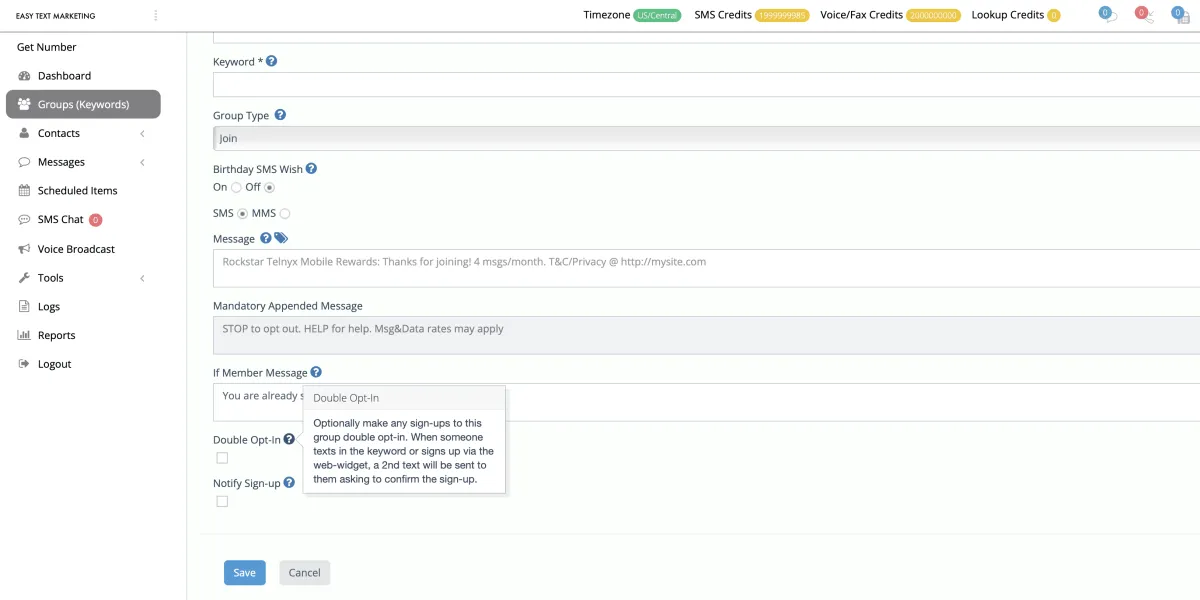
Step 6 - Decide if you want/need double opt-in
Double opt-in means that your customer will receive a message after texting the keyword that says something like "Reply Y to confirm sign-up". Check your state and local laws to see if this is required. If this is not required, it may not be a good idea since they may forget to reply with the 'Y'.
Step 7 - Decide whether or not you want to be notified upon opt-in
Typically you would only want to be notified if you're using text for lead generation where you want to call the customer after they opt-in. If you're building a list on a large scale, you may get annoyed by all of the opt-in notifications. Plus, you're paying for each text message you get to notify you upon opt-in so decide whether or not it's right for your use case
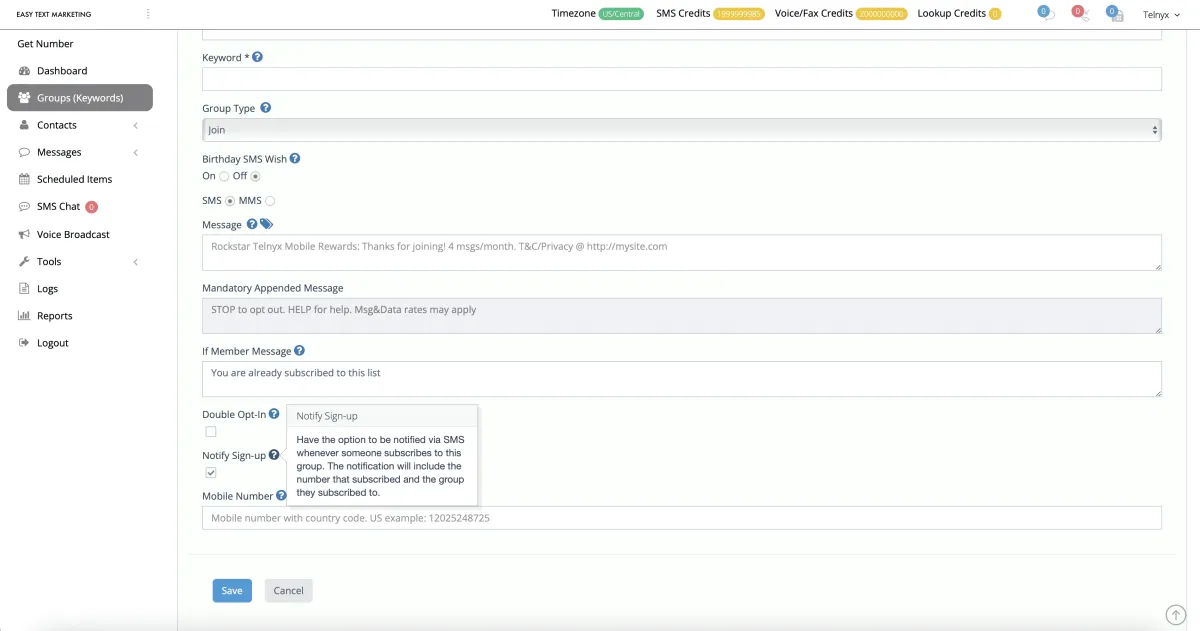
Step 8 - Mobile Opt-In notification setup
If you do decide to receive opt-in notifications, be sure you enter your mobile number including country code (example for USA would be 15552347890).
NOTE: You will only be notified on the FIRST time that they text your keyword. Once they've joined the group, you won't receive a notification if they text that keyword again.
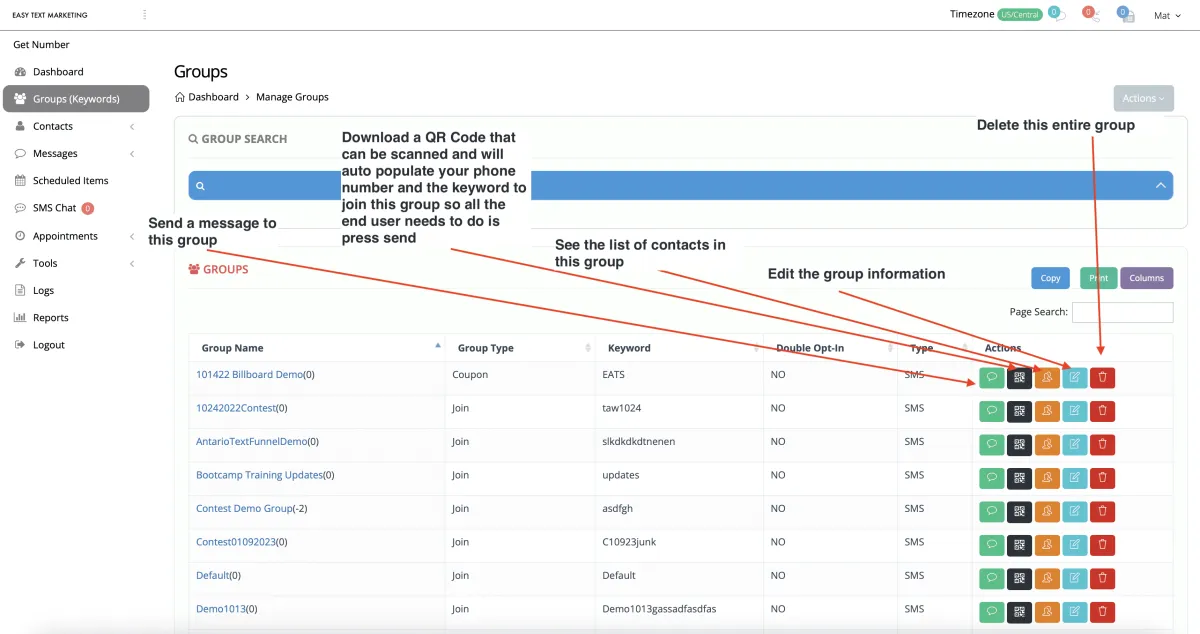
Editing Existing Keyword Groups
Green button - Send a text message to the entire group.
Black button - Download QR code so that people can scan it and just press send, to join the keyword group.
Orange button - See the group members and delete or edit single members.
Blue button - Edit the group.
Red button - Delete the group [this cannot be undone!]
How to Manage Contacts
Follow these instructions step-by-step to create groups and keywords.
How to Edit Contact Information
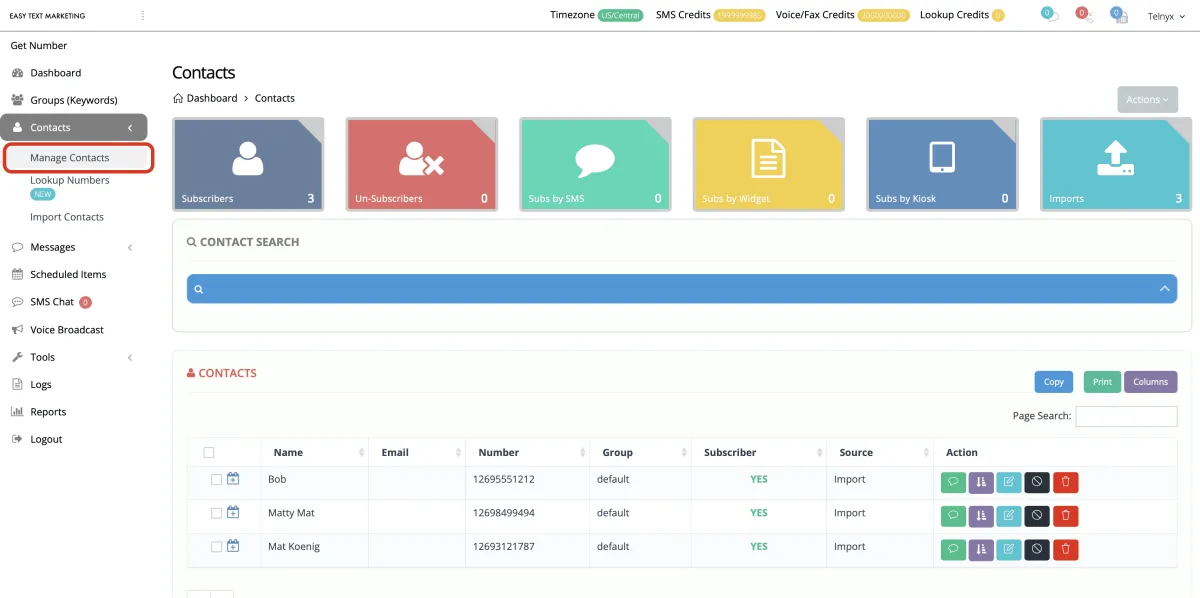
When accessing contacts you will click the contacts link on the left side of the dashboard.
To edit existing contacts, or manually add a single contact, you will then click 'Manage Contacts'
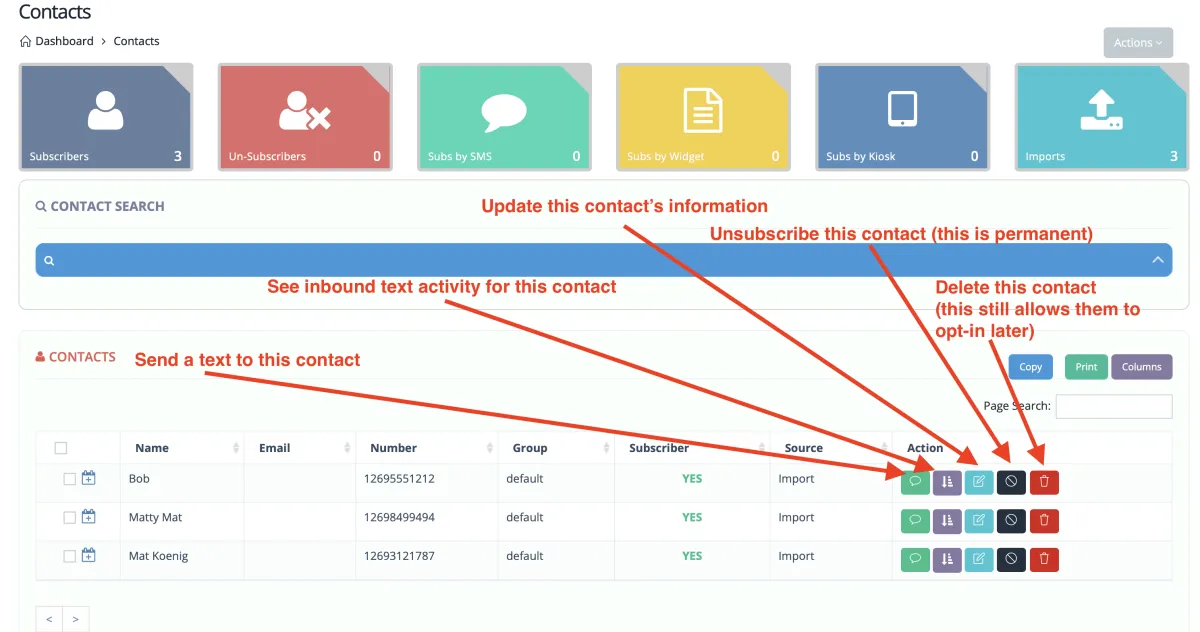
Contact Action Buttons
Green Button - Use this to send a text message to that particular contact
Purple Button - Use this to see inbound SMS message activity for that particular contact
Light Blue Button - Use this to edit/update information for that particular contact
Black Button - Use this to unsubscribe that particular contact from all communications.
NOTE: THIS IS PERMANENT unless the person texts the word 'start' to your phone number which will resubscribe them. It is highly unlikely that they will do this so be careful with this button.
Red Button - Use this to delete that particular contact from all of your lists.
NOTE: If you just want to remove a contact from a particular list you can do so by going into the Groups section, clicking the Members action button, and removing them from there. This will not remove them from other groups.
Adding or Editing a specific Contact
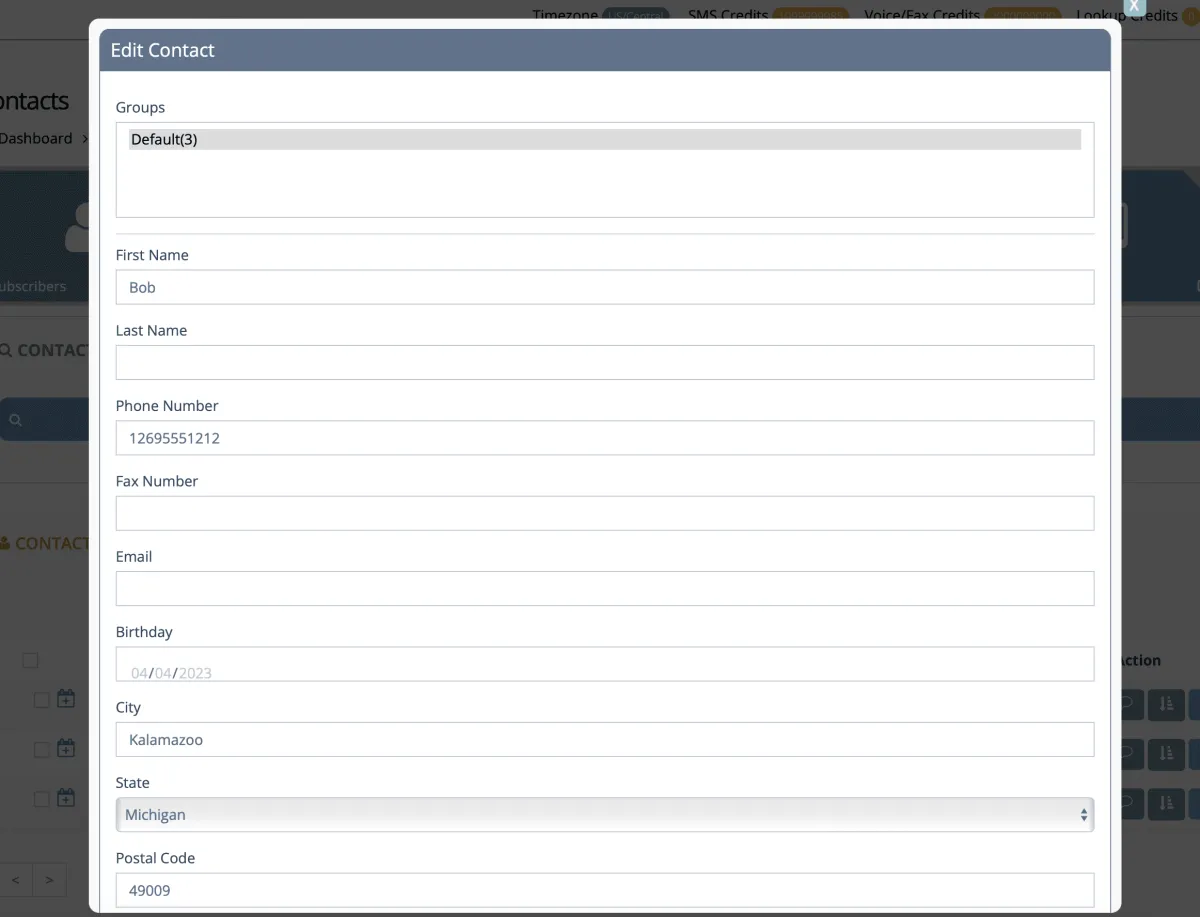
Adding: When manually adding a contact, be sure you click the group that you want to add them to in the section at the top [labeled 'Groups'] otherwise it will not save the contact. To save them, they must be added to one of the keyword groups.
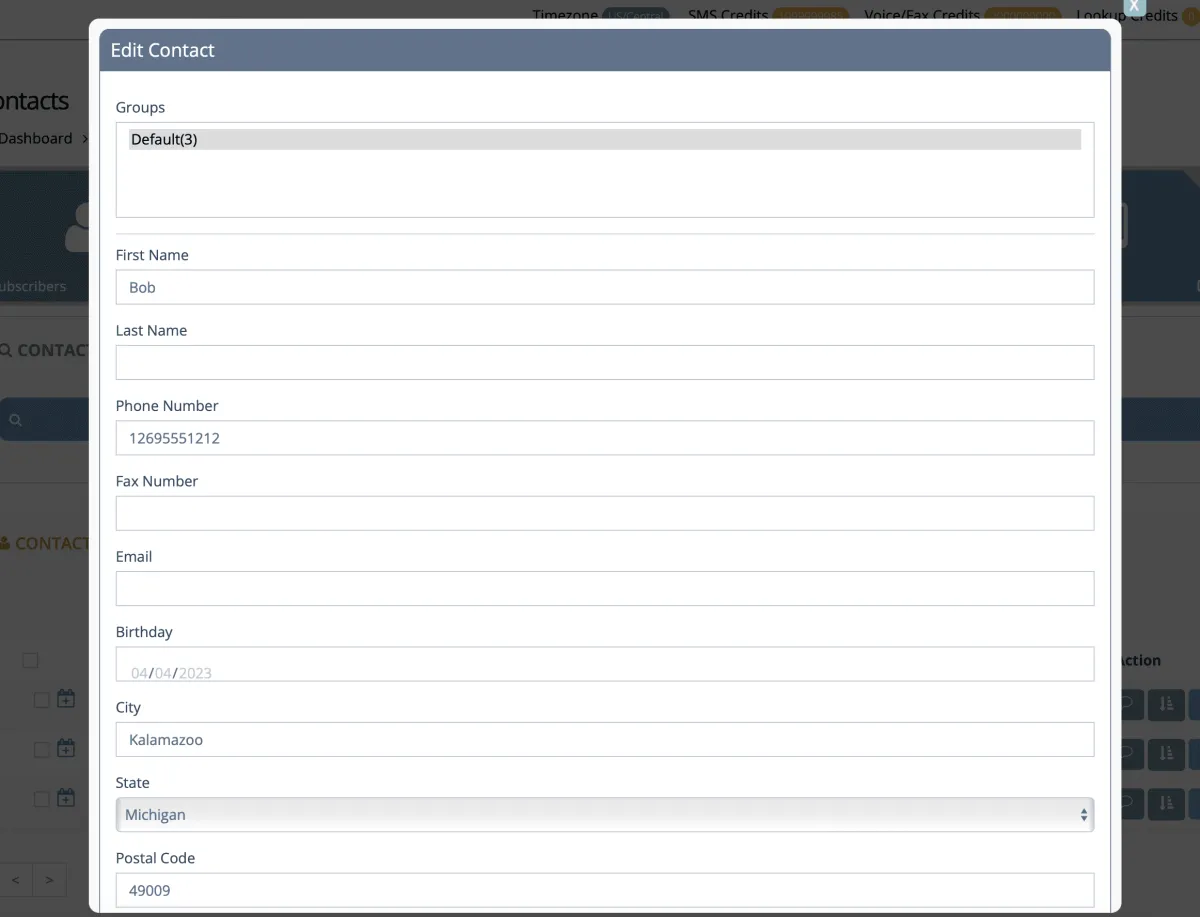
Editing: When editing a contact, you'll click the light blue edit button you will see all of the fields that are available to edit, including the groups that they belong to.
How to Import Contacts
NOTE: Pay attention to your state and local laws when uploading contact lists to be sure you are not in violation of those rules. When uploading a list you accept 100% responsibility for checking all of your local laws and agree to hold harmless Rockstar SMS and Rockstar Designs LLC.
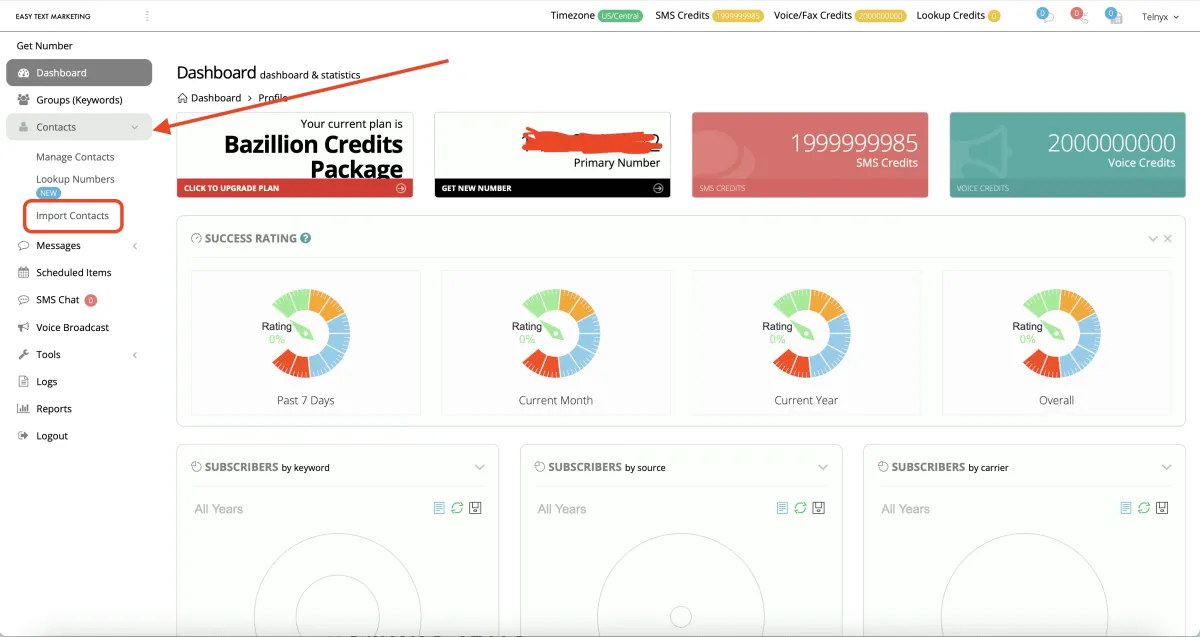
Step 1 - Click Contacts, then import contacts
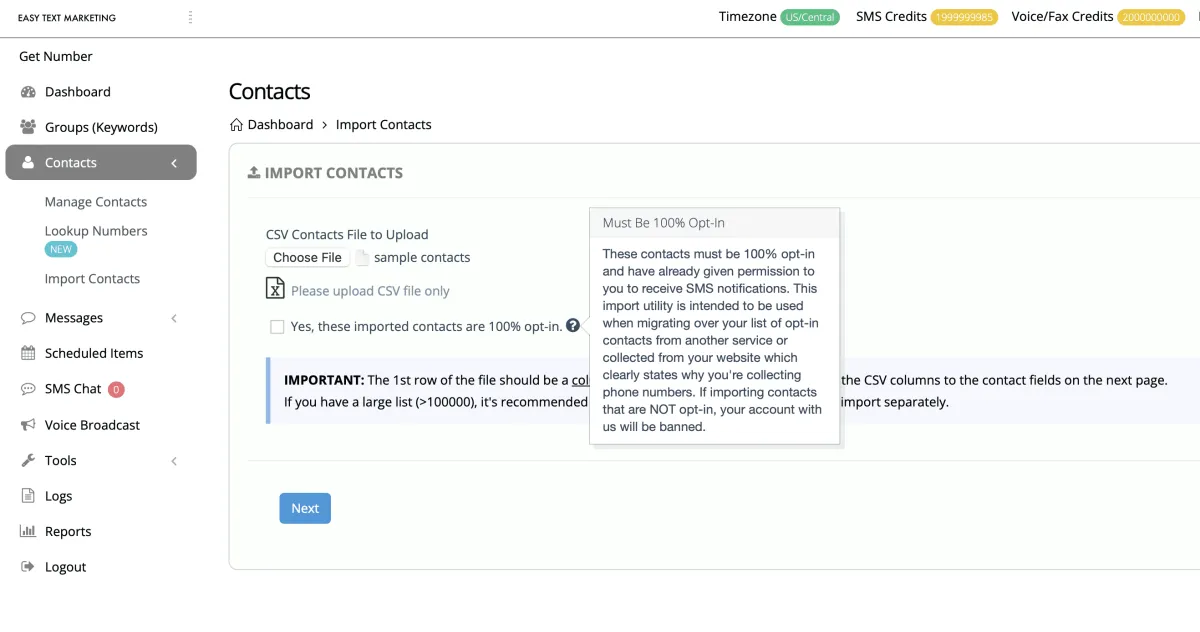
Step 2 - Choose the CSV file that you want to import
NOTE: These contacts must be 100% opt-in. That means they have given you permission to text them. You must check the box to confirm this.
Pay attention to the parameters outlined in the IMPORTANT section as well.
Step 3 - Click on the Groups that you want the contact to be added to.
If you do not select a group, the contacts will not properly import so you MUST select at least 1 group. If you haven't added a Keyword Group yet, please go back and add a Keyword Group first, then import your contacts.
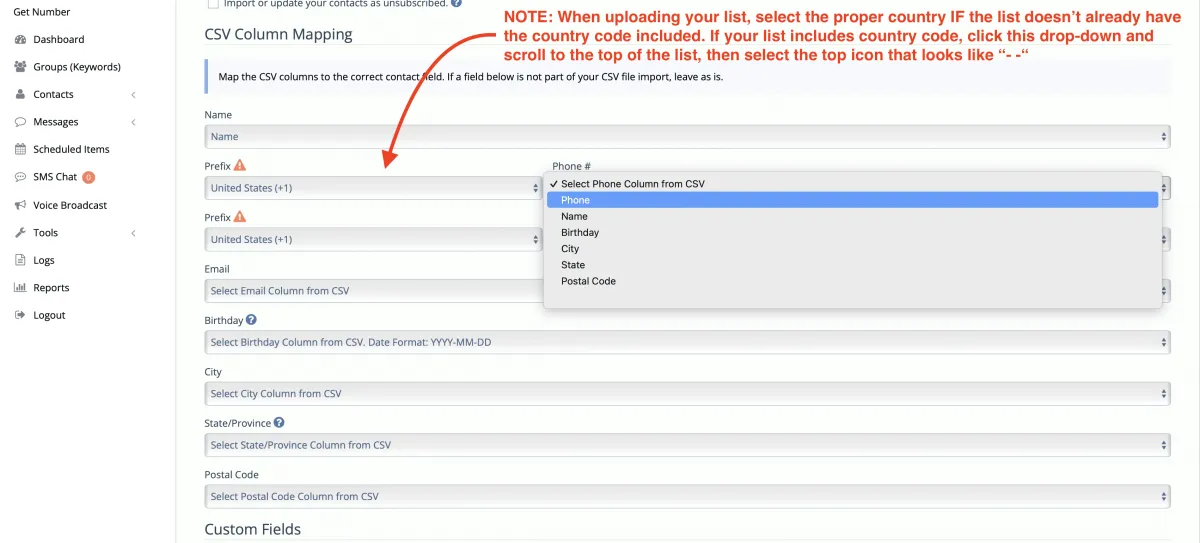
Step 4 - Map your fields to the appropriate column headers from your CSV spreadsheet
IMPORTANT: Pay close attention to the Prefix dropdown. This is where you're selecting the country code (or removing the country code if your list already has the country code included in the phone number).
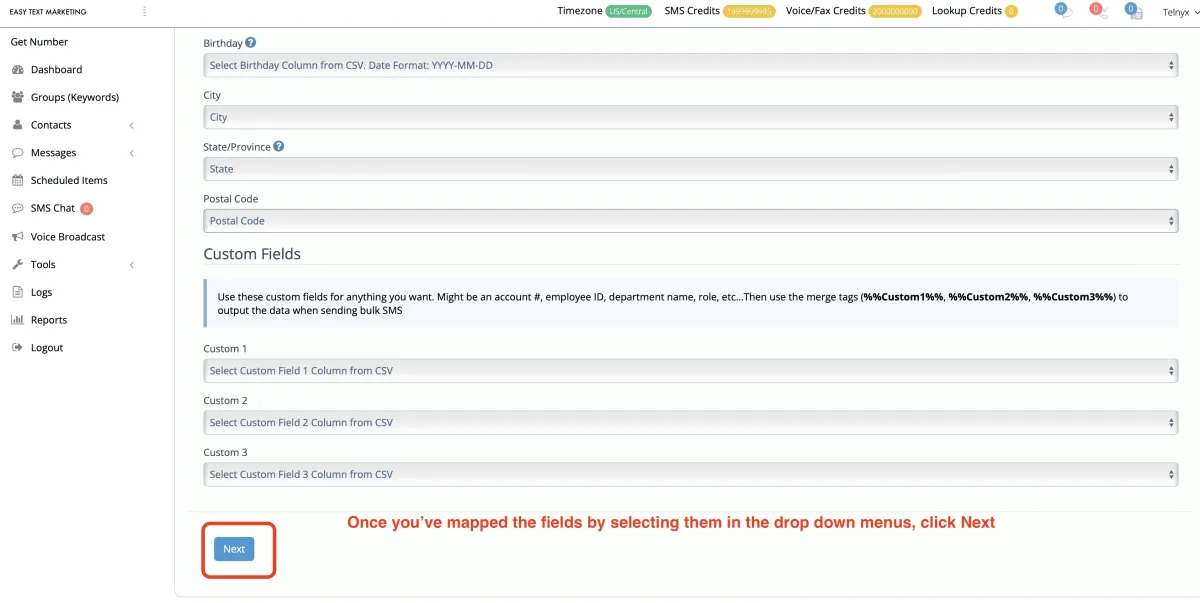
Step 5 - Once you have mapped all fields properly, scroll to the bottom and click Next
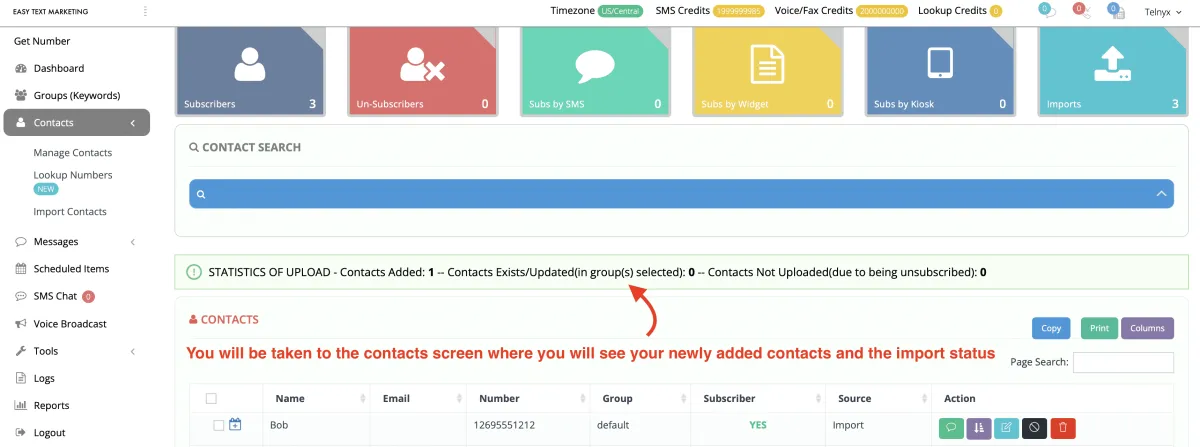
Step 6 - Review the import results
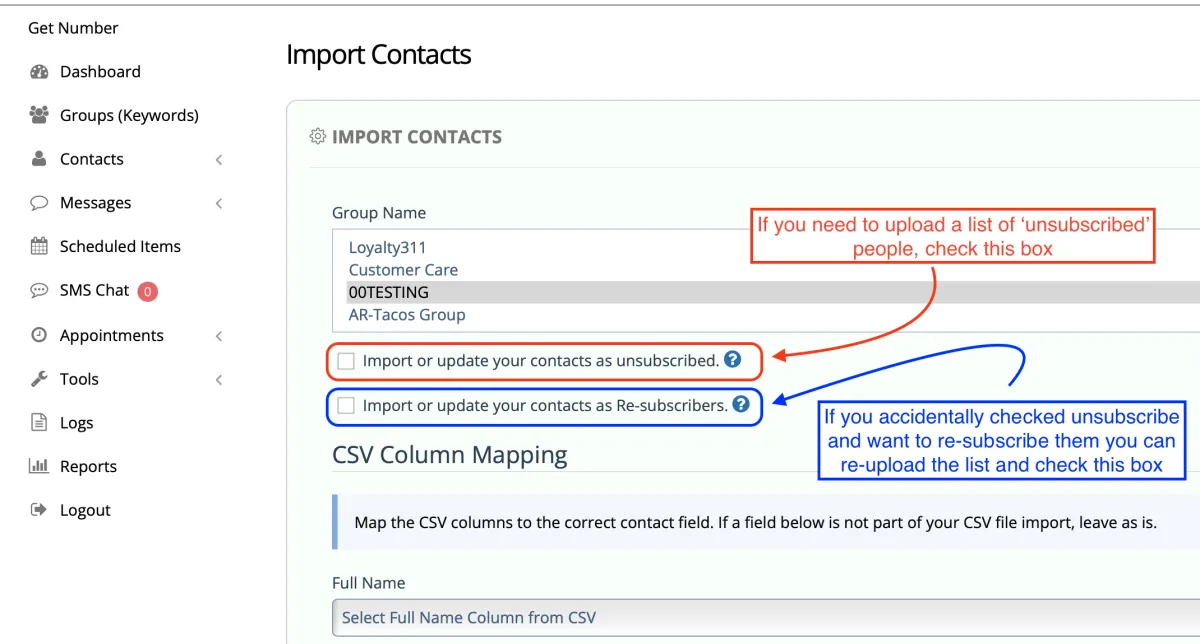
UPLOADING UNSUBSCRIBED CONTACTS AND RE-SUBSCRIBING CONTACTS
Sending Messages
Follow these instructions to get the best results when sending messages
Access Messages
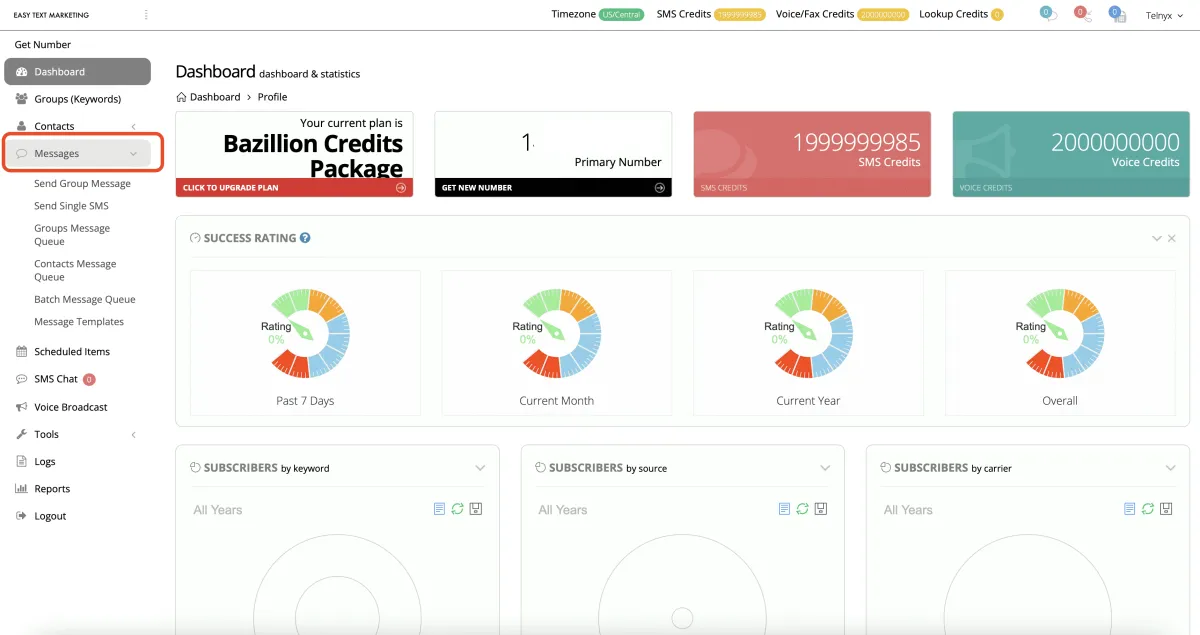
Messages Feature Functionality Overview
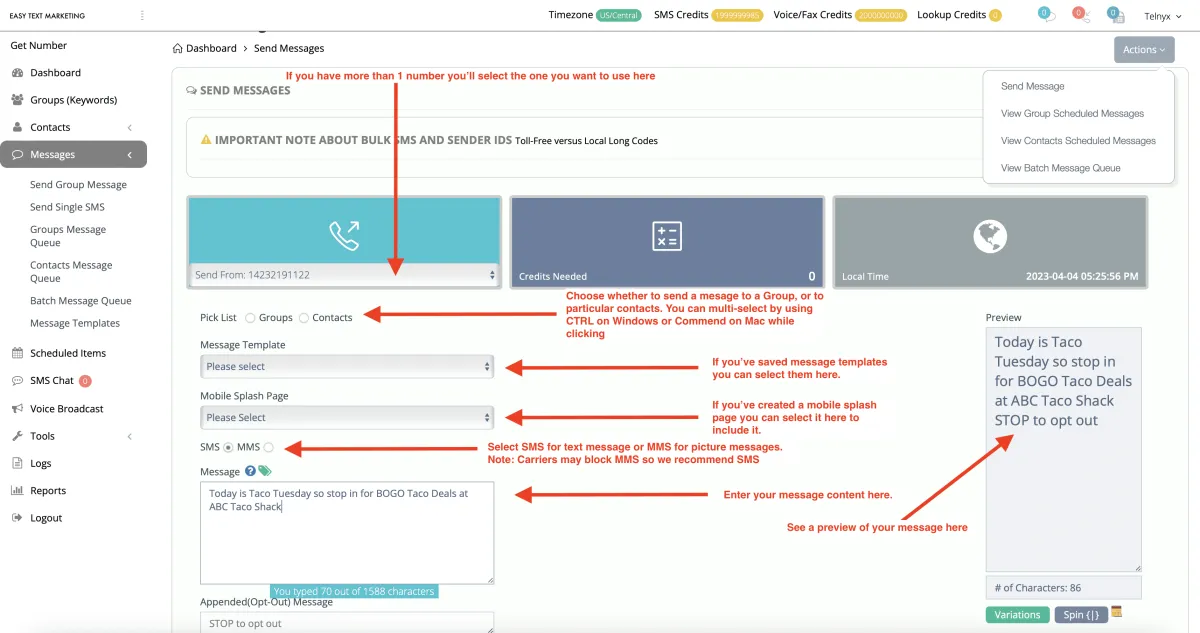
Messaging Queue Access
This is where you can check the status of your scheduled messages
Groups - Scheduled message to entire group
Contacts - Scheduled messages to specific contacts
Batch - Scheduled messages to extremely large groups that you've segmented into batches
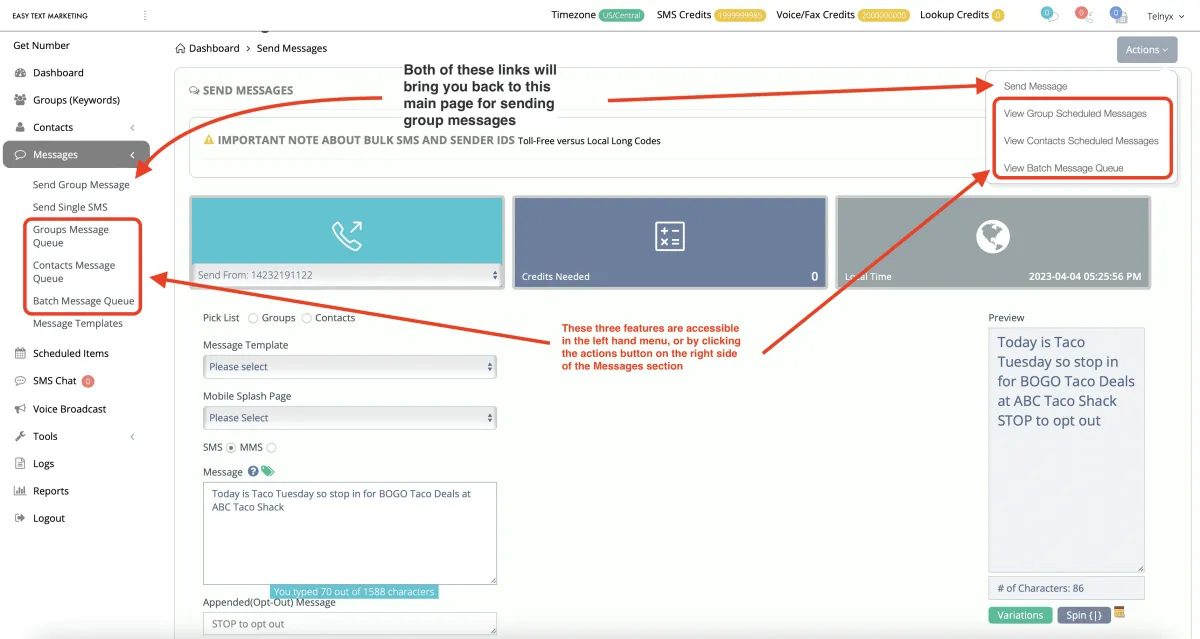
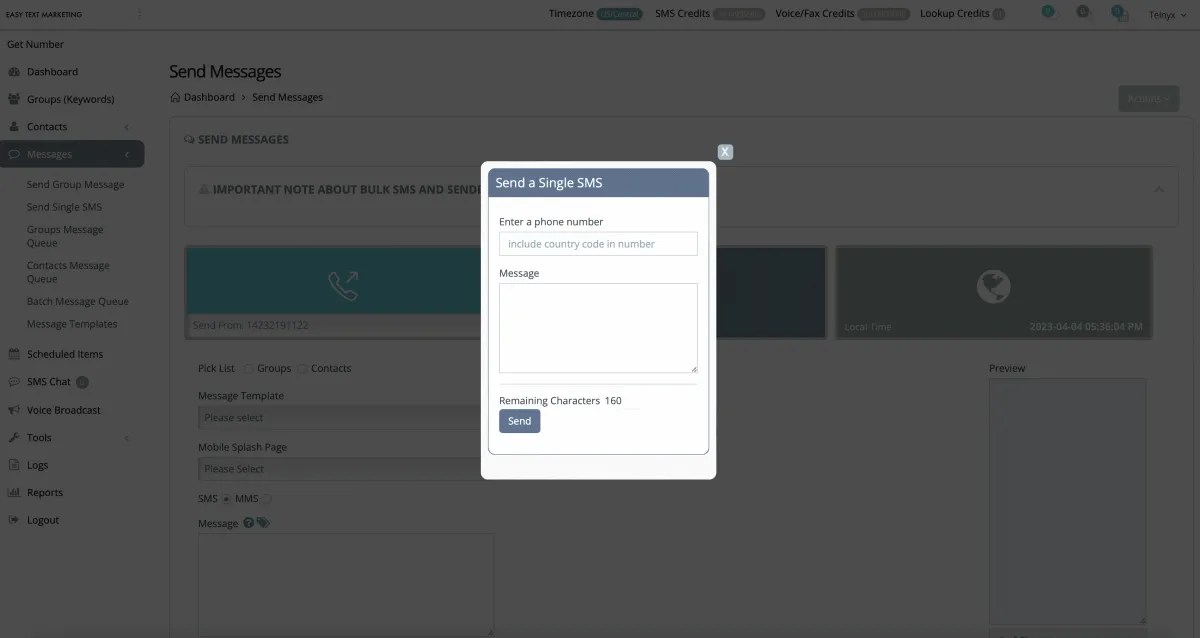
Sending a single text message to a specific phone number STEP 1
Click Messages
Click send Single SMS
Enter the specific phone number you want to send a one time message to
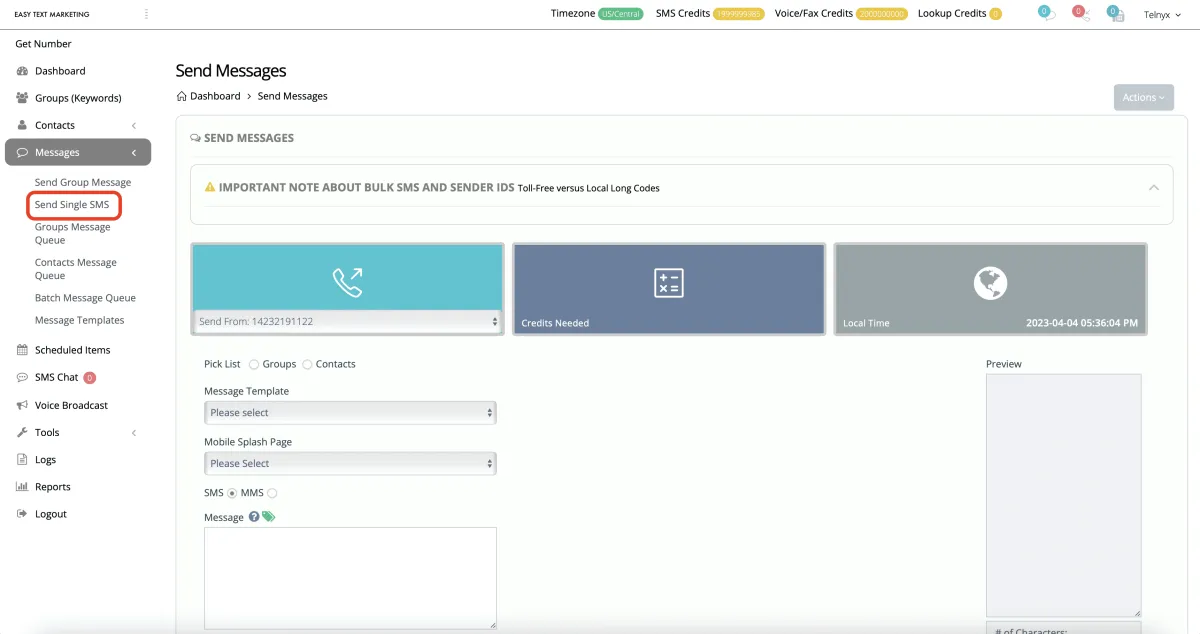
Sending a single text message to a specific phone number STEP 2
Enter the phone number, including the country code
Type your message of 160 characters or less
Click send
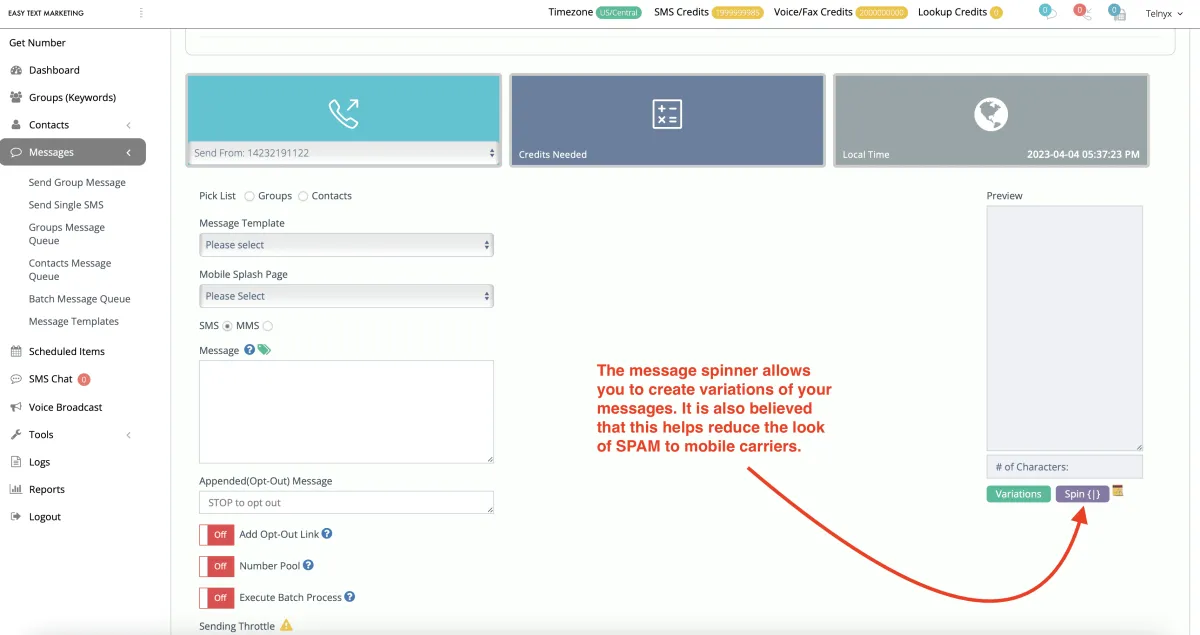
Message Spinner Part 1
The message spinner is designed to add variety to your bulk messages. Once you add the parameters to your message, you can click the Spin button to see the different variations.
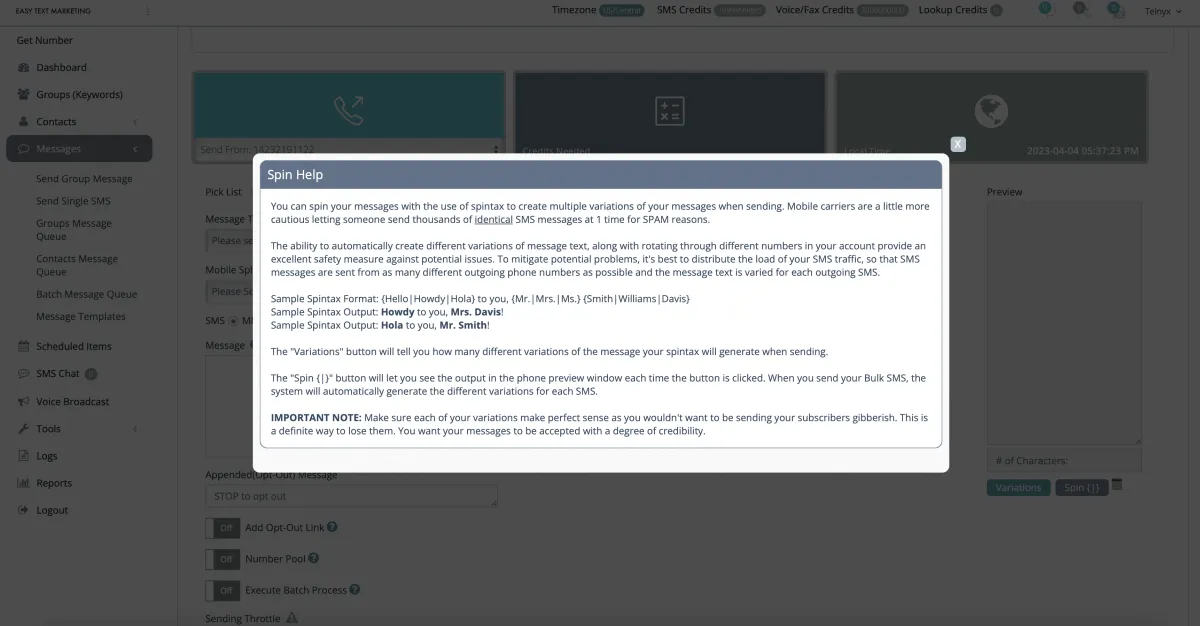
Message Spinner Part 2
Click the yellow notepad icon to see the instructions for using the message spinner.
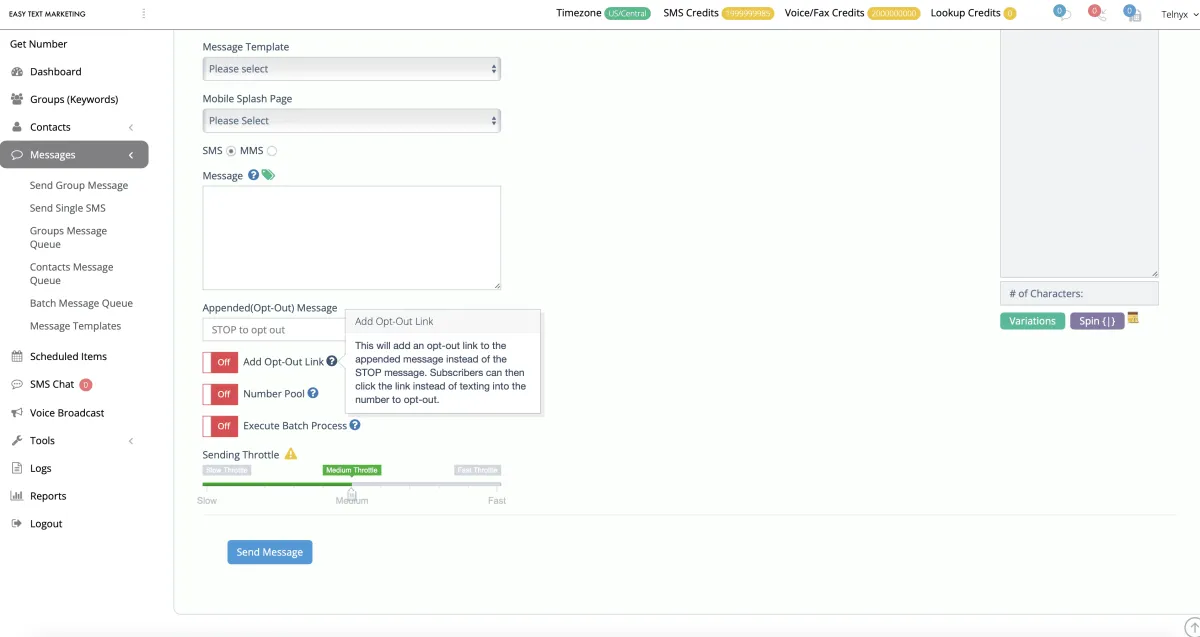
Adding a click to opt-out link
You can add a one-click opt-out link to your messages if you prefer by toggling this switch
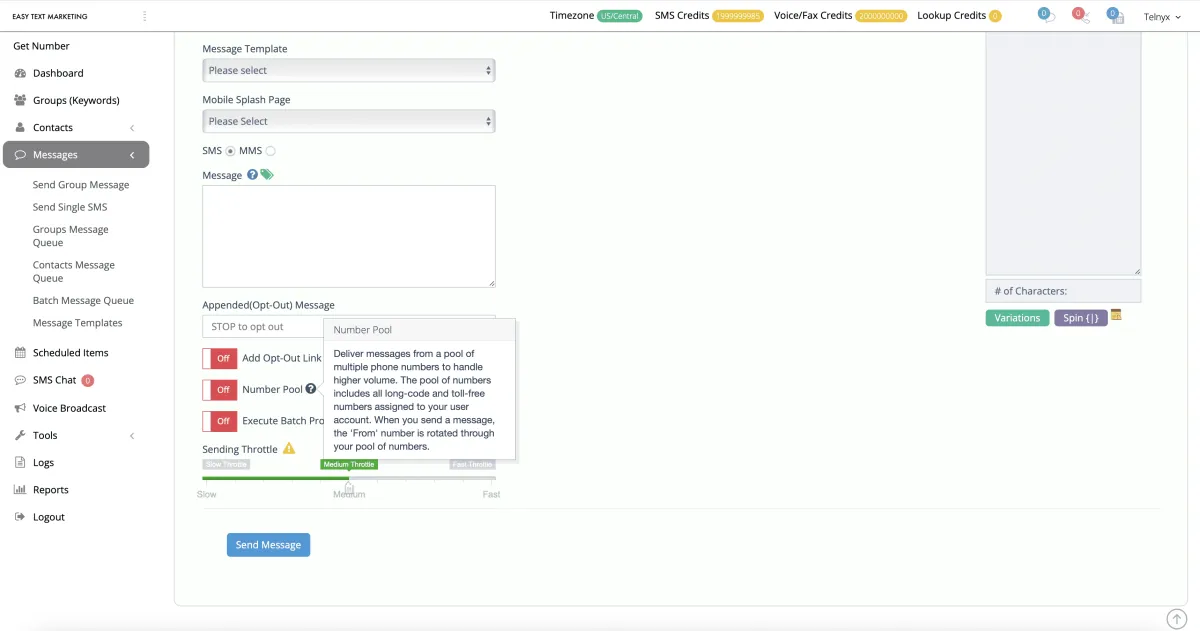
Number Pool
If you use multiple numbers to send large group messages, you can toggle this switch to send your messages from the pool of phone numbers.
NOTE: Check your local laws regarding messaging prior to using number pool feature. We recommend sending from the same phone number that your client used to opt-in.
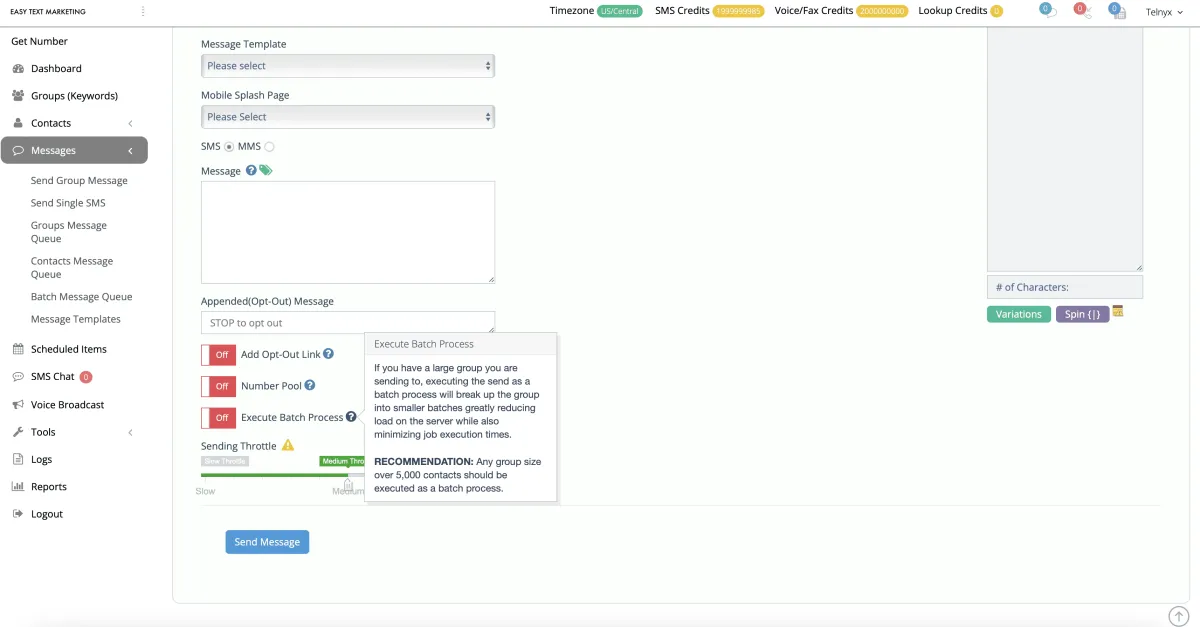
Batch Process Execution [Best for Large Lists]
This feature is recommended when sending messages to groups of 5,000 or more so that it will break your messages into smaller sections for improved deliverability.
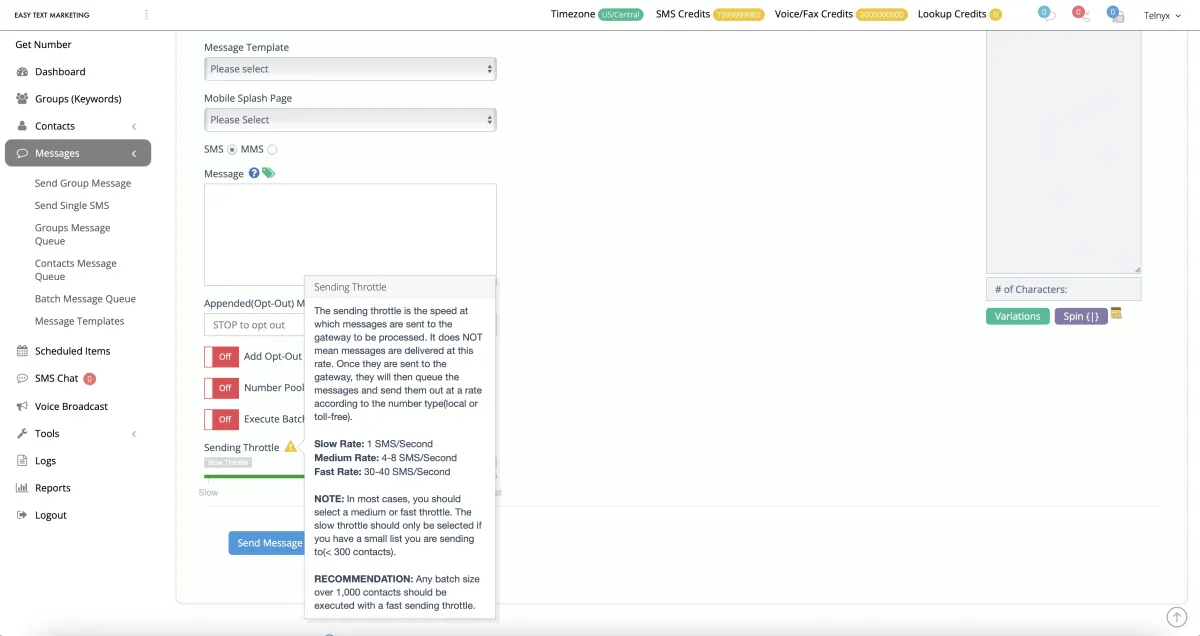
Sending Throttle Feature
Most messages should be sent with the default, medium sending throttle. However, when sending to large batches with more than 1,000 contacts we recommend using the faster throttle setting.
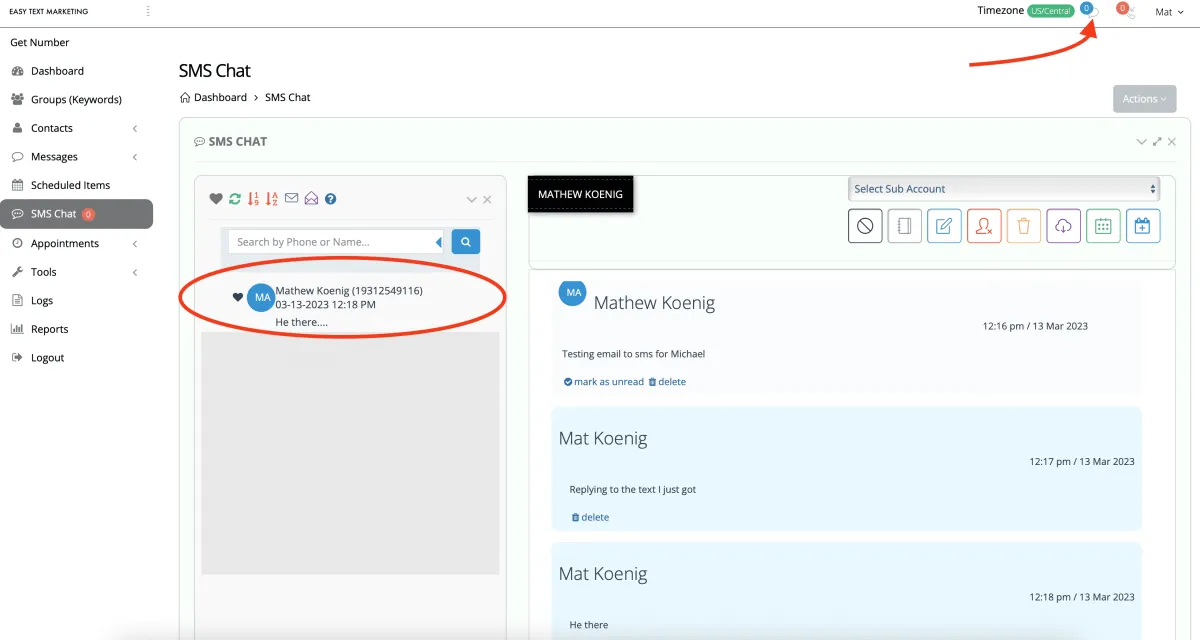
SMS Chat Inbox
This is used for conversations with customers via SMS. If a customer sends a message that is not assigned to a keyword group, a notification will appear at the top of the screen near the chat bubble and their message will be sent into the SMS Chat section.
When you click on SMS Chat in the left rail, you'll be able to have a conversation with your customer via SMS
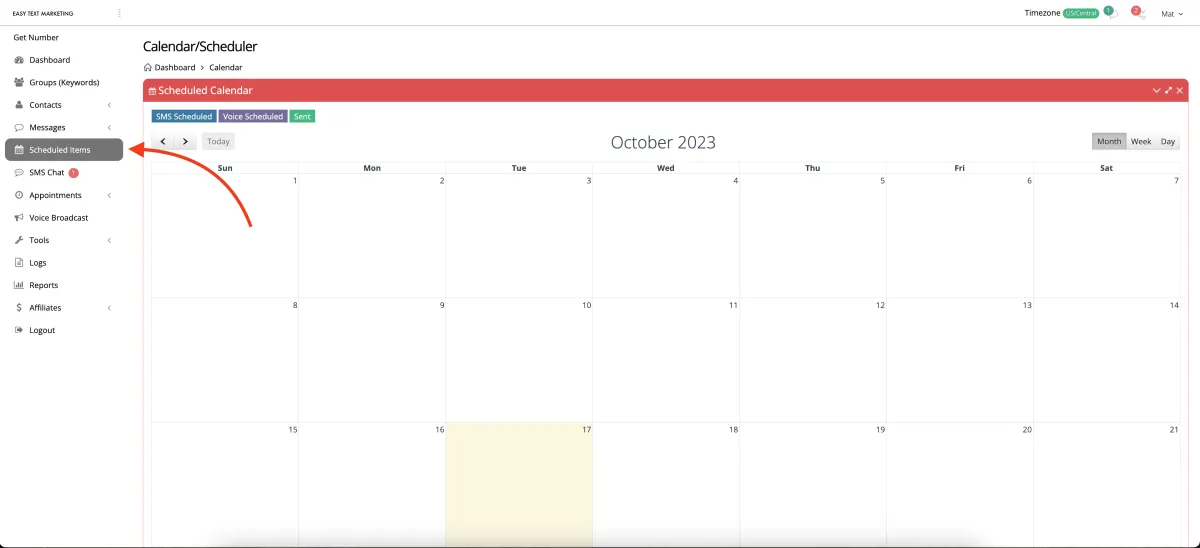
Scheduled Items
Use this feature to keep track of messages that you have scheduled.
Click on scheduled items in the left menu to see all messages that are scheduled, and those that have been sent.
Voice Broadcast
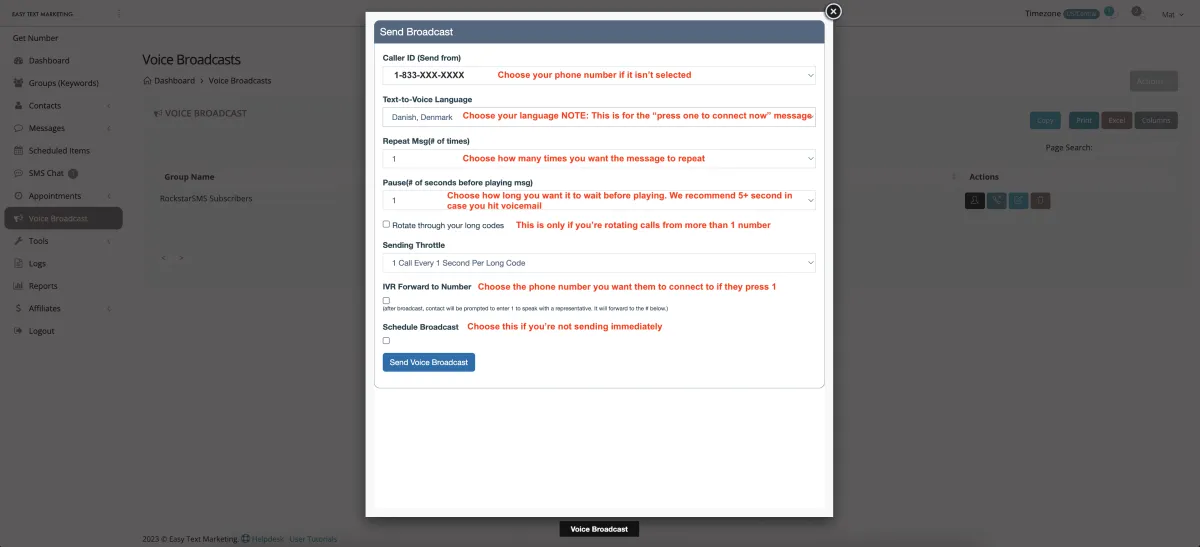
Voice broadcasts are used to call a keyword group of subscribers and play a recording from you. You can also set it up so they can "press 1" to be connected to you. One example of how to use this would if you want to get people to book appointments with you for a special offer. You could create a recording that says "Right now ABC Chiropractic is offering 75% off any adjustments booked within the next 24 hours." and then the automated system would say "press 1 to be connected".
Step 1 - Click on Voice broadcast in the left menu
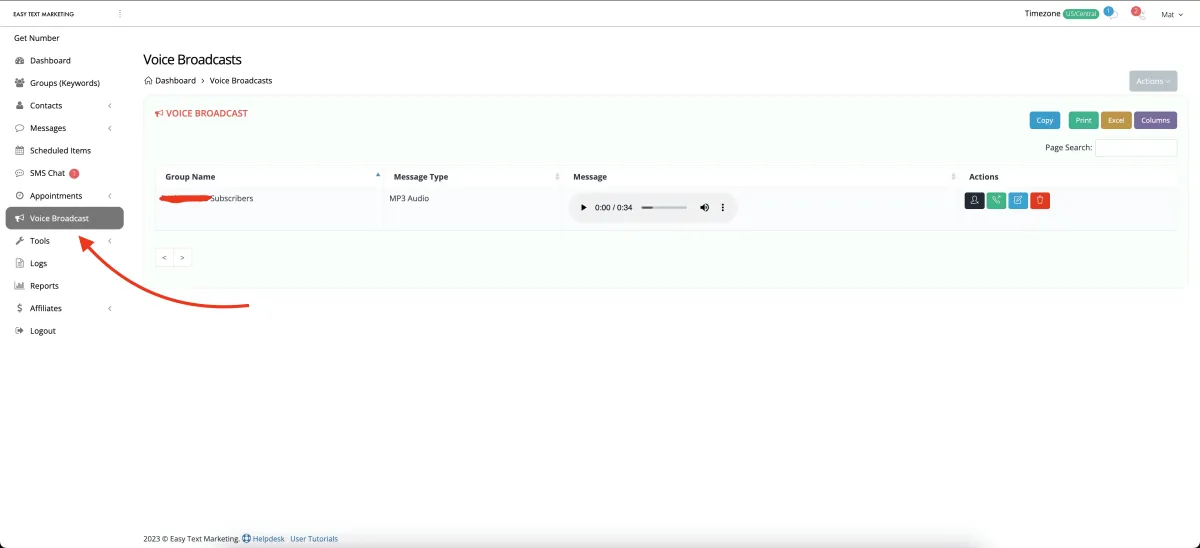
Step 2 - Select your group, and the message type (text to voice, or upload a recorded .mp3)

Step 3 - Send your broadcast
Voicemail and Call Forwarding
Our system allows you to set a voicemail message that customers can hear if they call your phone number, OR, you can have your phone number forward to your phone (mobile, or another phone) to use your own voicemail without sharing your personal phone number.
NOTE: If you turn on call forwarding, you do not want to enable the voicemail in our system. You will choose one or the other.
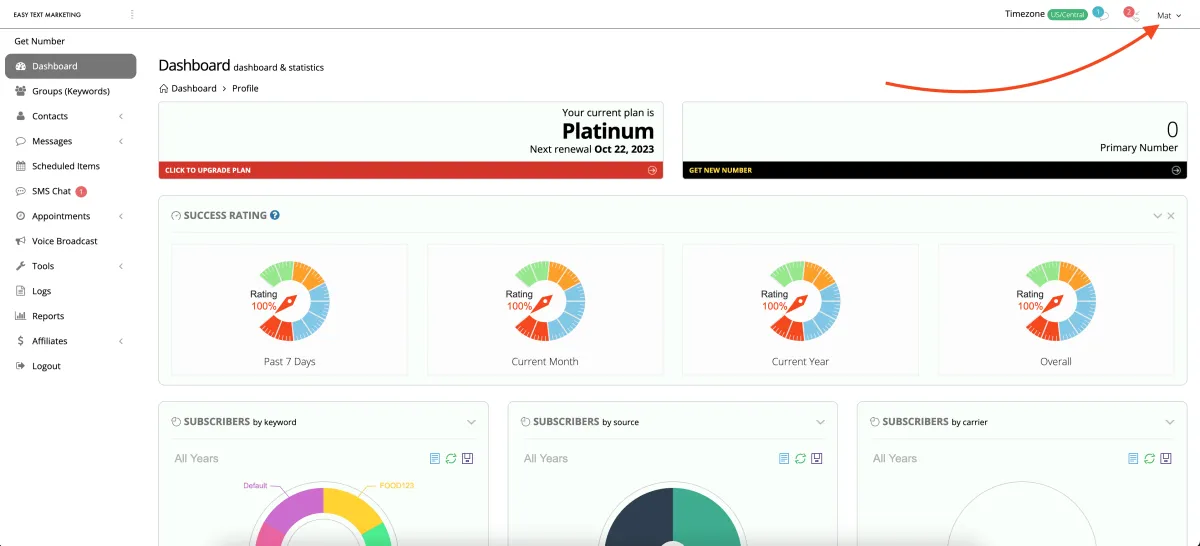
Step 1 - Hover over your name and click 'account'.
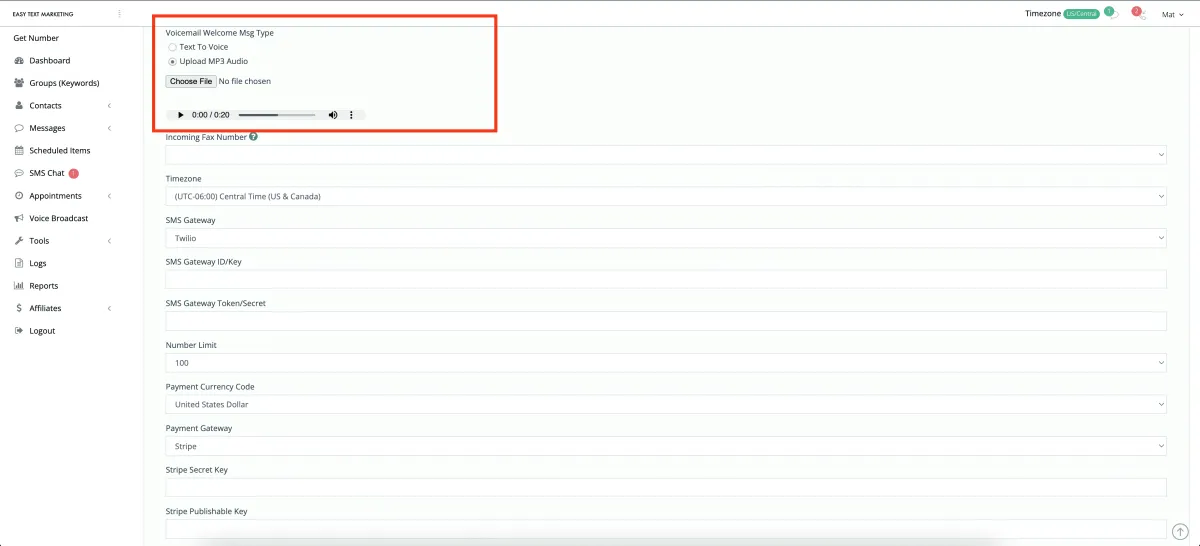
For Voicemail:
Select Text to voice (type your voicemail), or upload your pre-recorded .mp3 file.
For Call Forwarding:
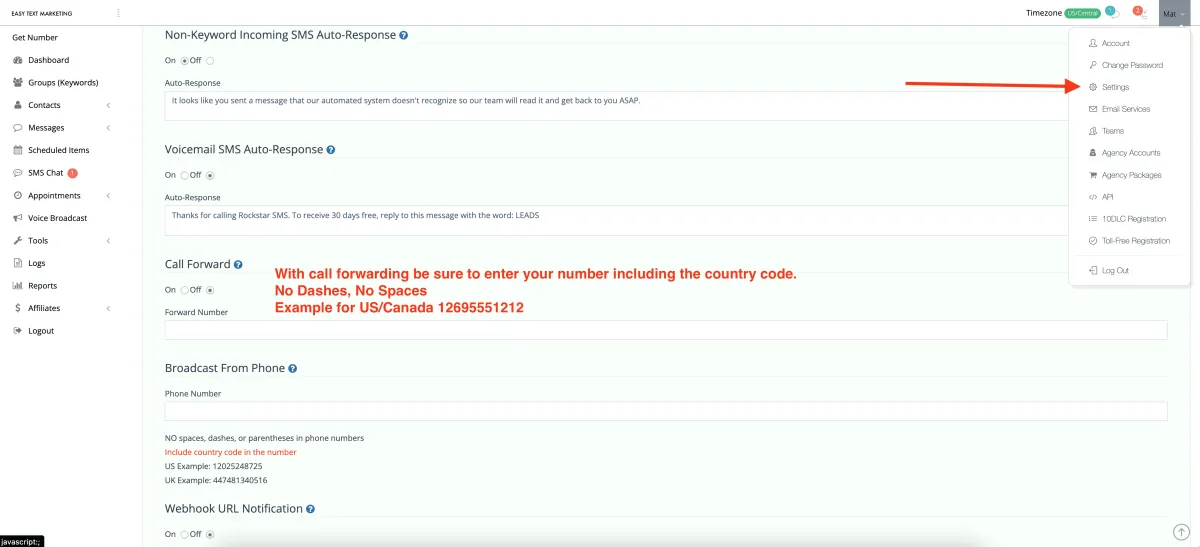
Mouse over your name. Then Click settings and scroll to call forwarding.
Module 3 - Platform Tools
Tools Overview
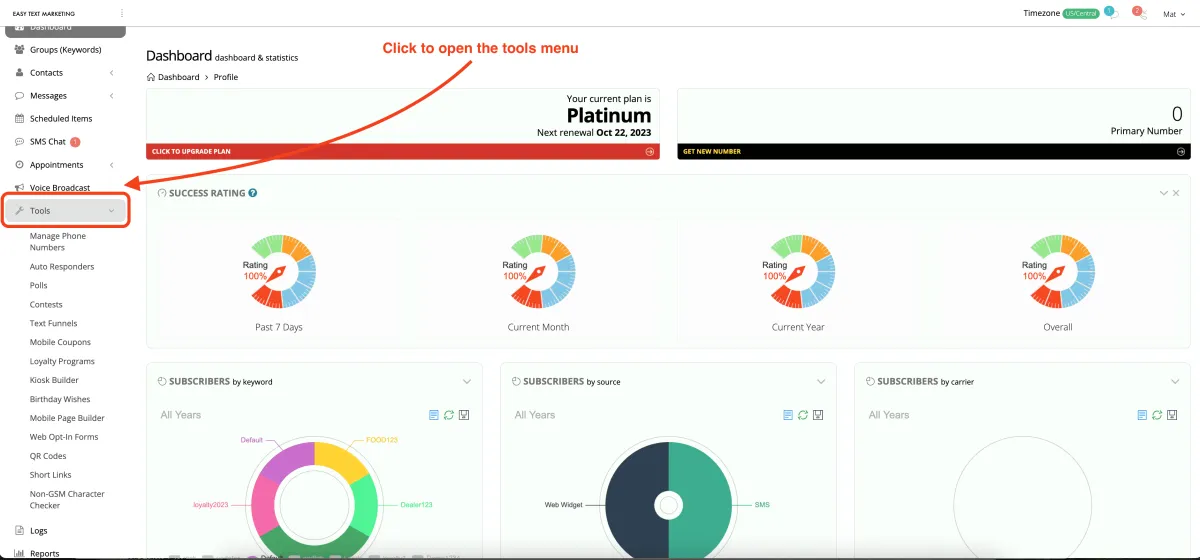
On the left side menu, click the 'Tools' link and it will open to reveal your ETM tools. NOTE: If you're having trouble with this, please turn off all plugins in your browser.
Auto Responders
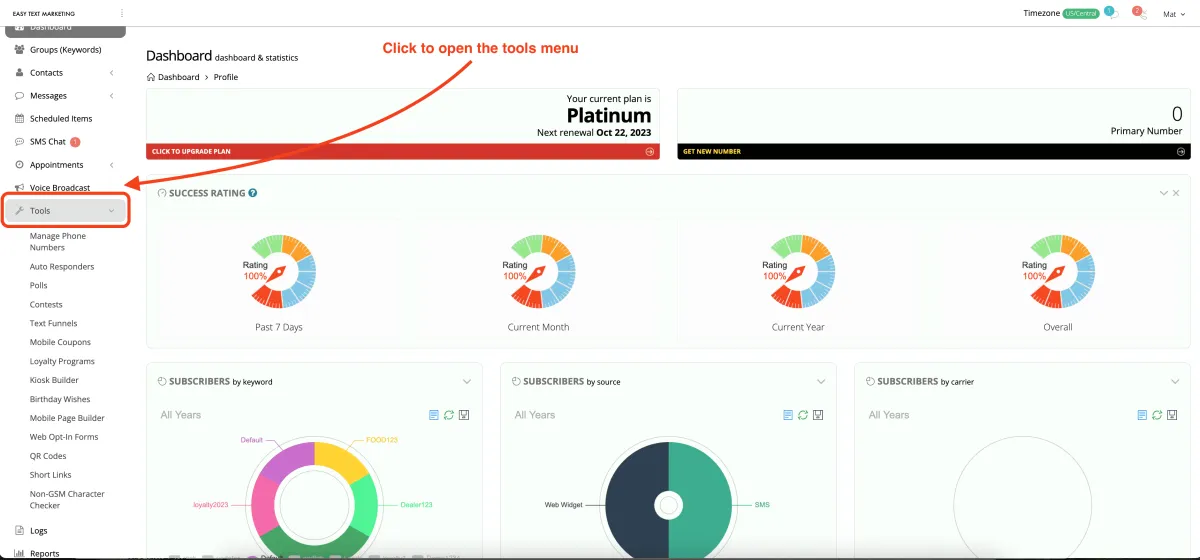
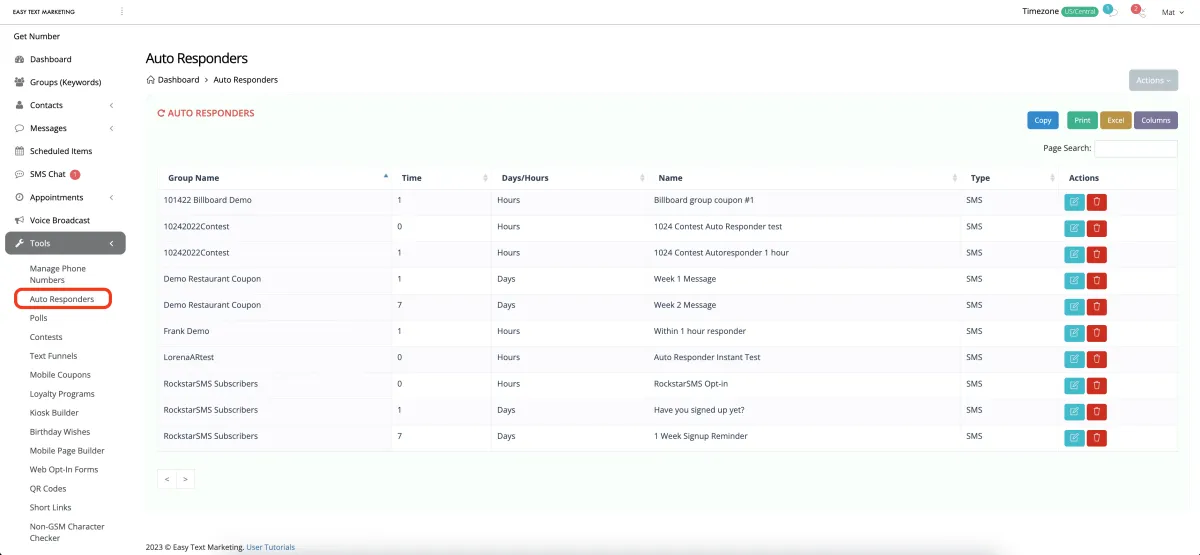
Open Tools Menu
Click Auto Responders
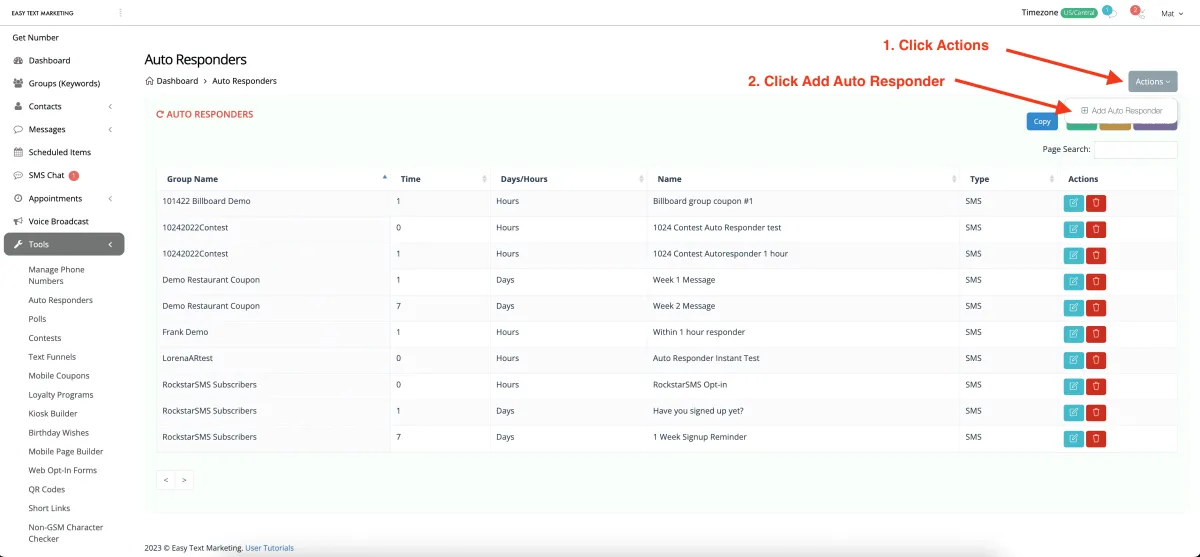
Click 'Actions'. Then click 'Add Auto Responder'
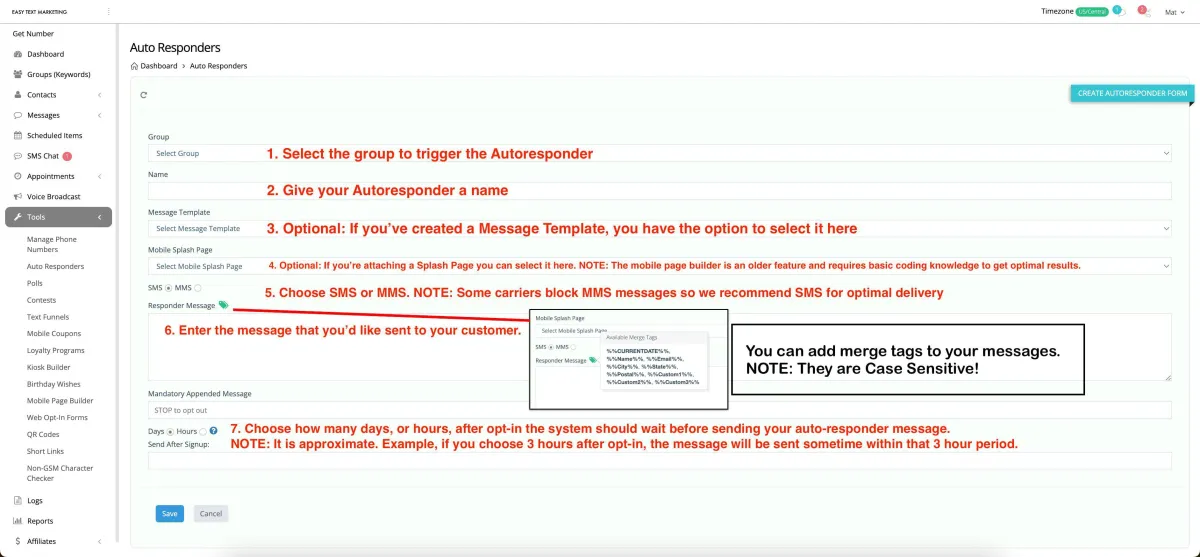
Walk through each step from the top down to set up your Autoresponder
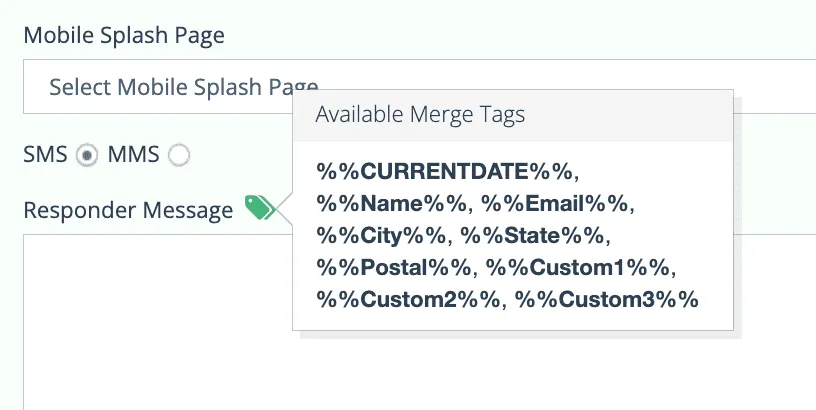
REGARDING MERGE TAGS:
You can add merge tags if you want to put things like date, name, or city into the message but they are Case Sensitive so be sure that the first letter is capitalized or it will NOT work.
Polls
How to Use Polls
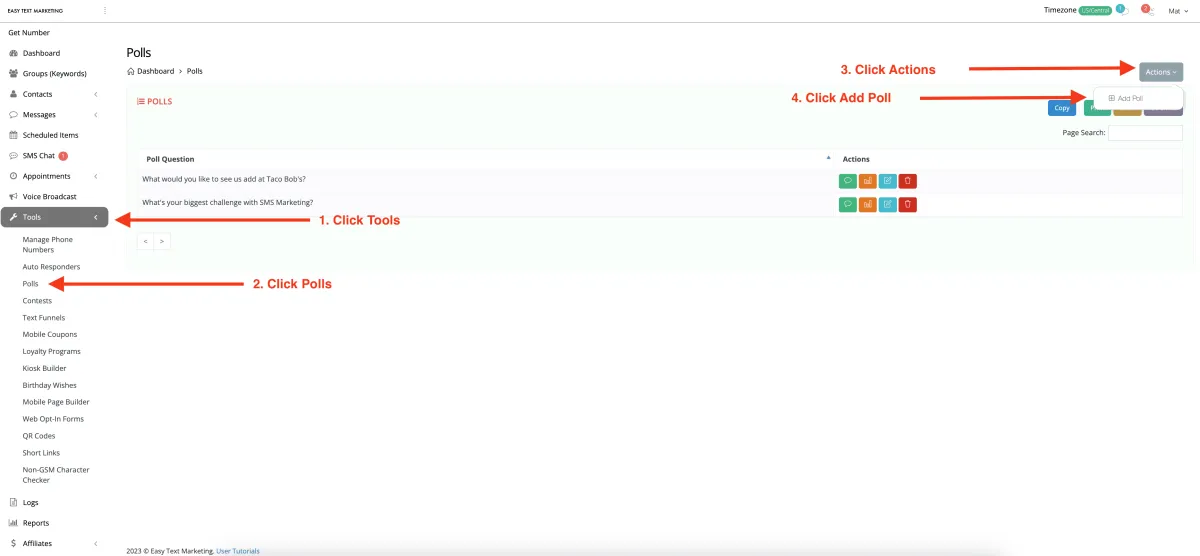
Click Tools > Polls > Actions > Add Poll
Complete the Polls Form
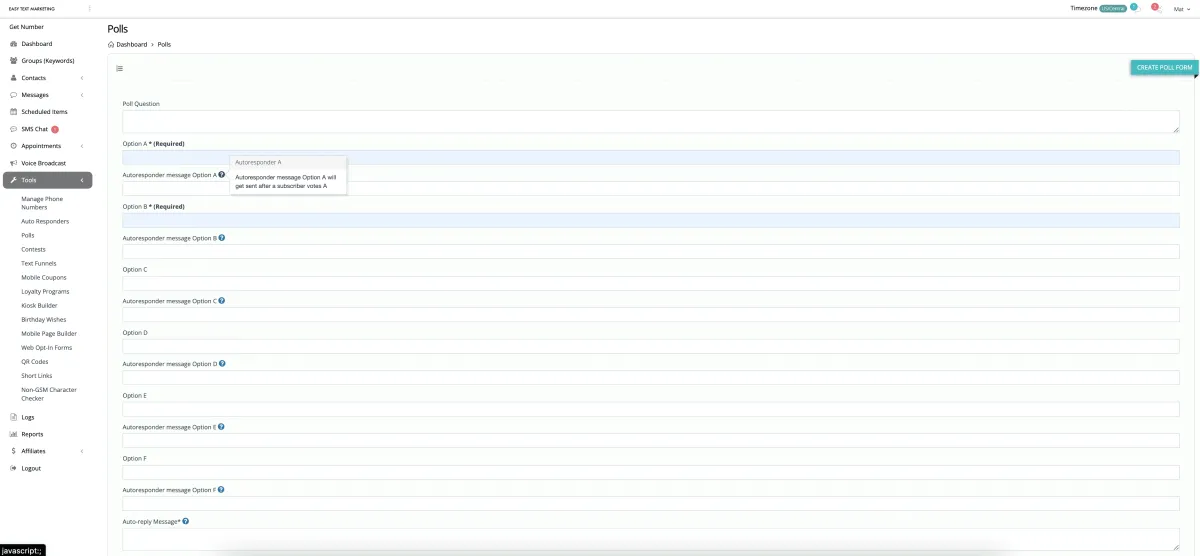
Enter your poll question in the top box.
Enter The option, and the reply you want someone to receive after each option.
Example: Poll question could be "What's your favorite Mexican Food?"
Option A: Tacos
Autoresponder Message Option A: Great we love Tacos too! Here's a coupon for BOGO Tacos [enter a mobile coupon link]
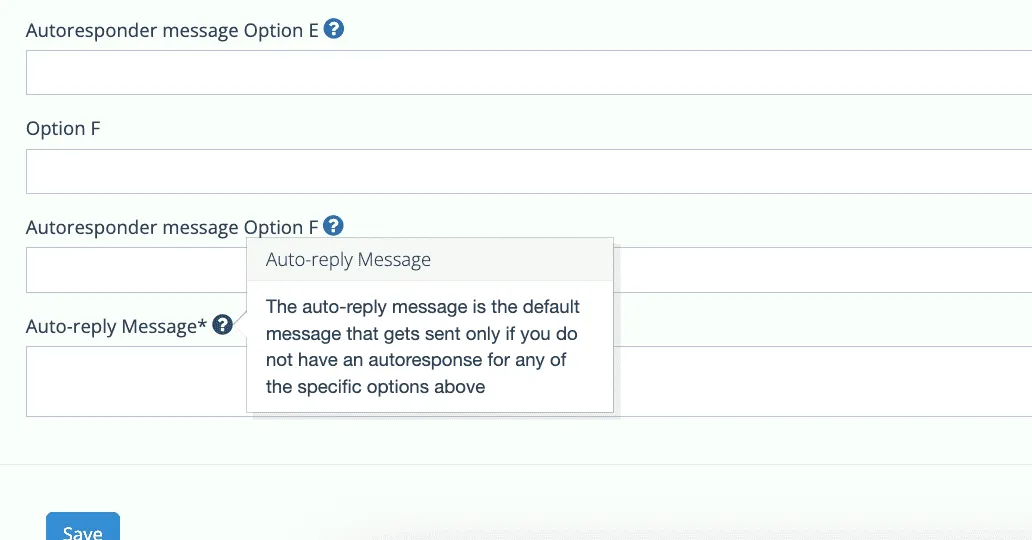
Below Option F there is a field titled "Auto-reply Message"
In this field, put a default response in case someone doesn't choose one of your options. For example, if you only give options A, B, C, but someone types in another letter, you could have a reponse that says something like: "Oops...that's not one of our options, try again by putting in A, B, or C"
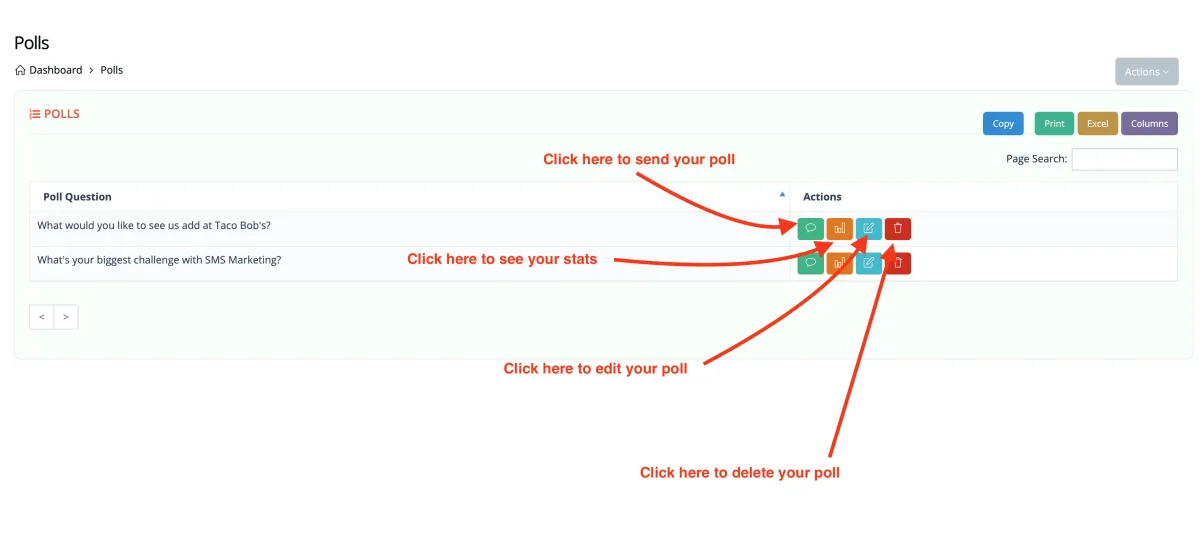
Finishing
Once you've created your poll, you'll be taken back to this screen
Contests
This video will show you how to create contests.
Text Funnels
This video will show you how to create text funnels.
Mobile Coupons
This video will show you how to create mobile coupons.
Loyalty Programs & Kiosk Builder
This video will show you how to create a loyalty program and a kiosk to go with it.
Web Signup Widget Forms
This video will show you how to create forms to capture information and let your customers opt-in to your lists.
QR Code Generator
This video will show you how to create QR codes
Module 4 - Reporting
Subscriber & Unsubscribed Reports
In this video you will learn how to Run Subscriber & Unsubscribed Reports
Understanding & Using Logs
In this video you will learn how to Export SMS Outbox Logs